Sunday, August 24, 2014

Gobi Bhaath (Cauliflower Rice) - Subtle and mellow on spices, huge on flavors

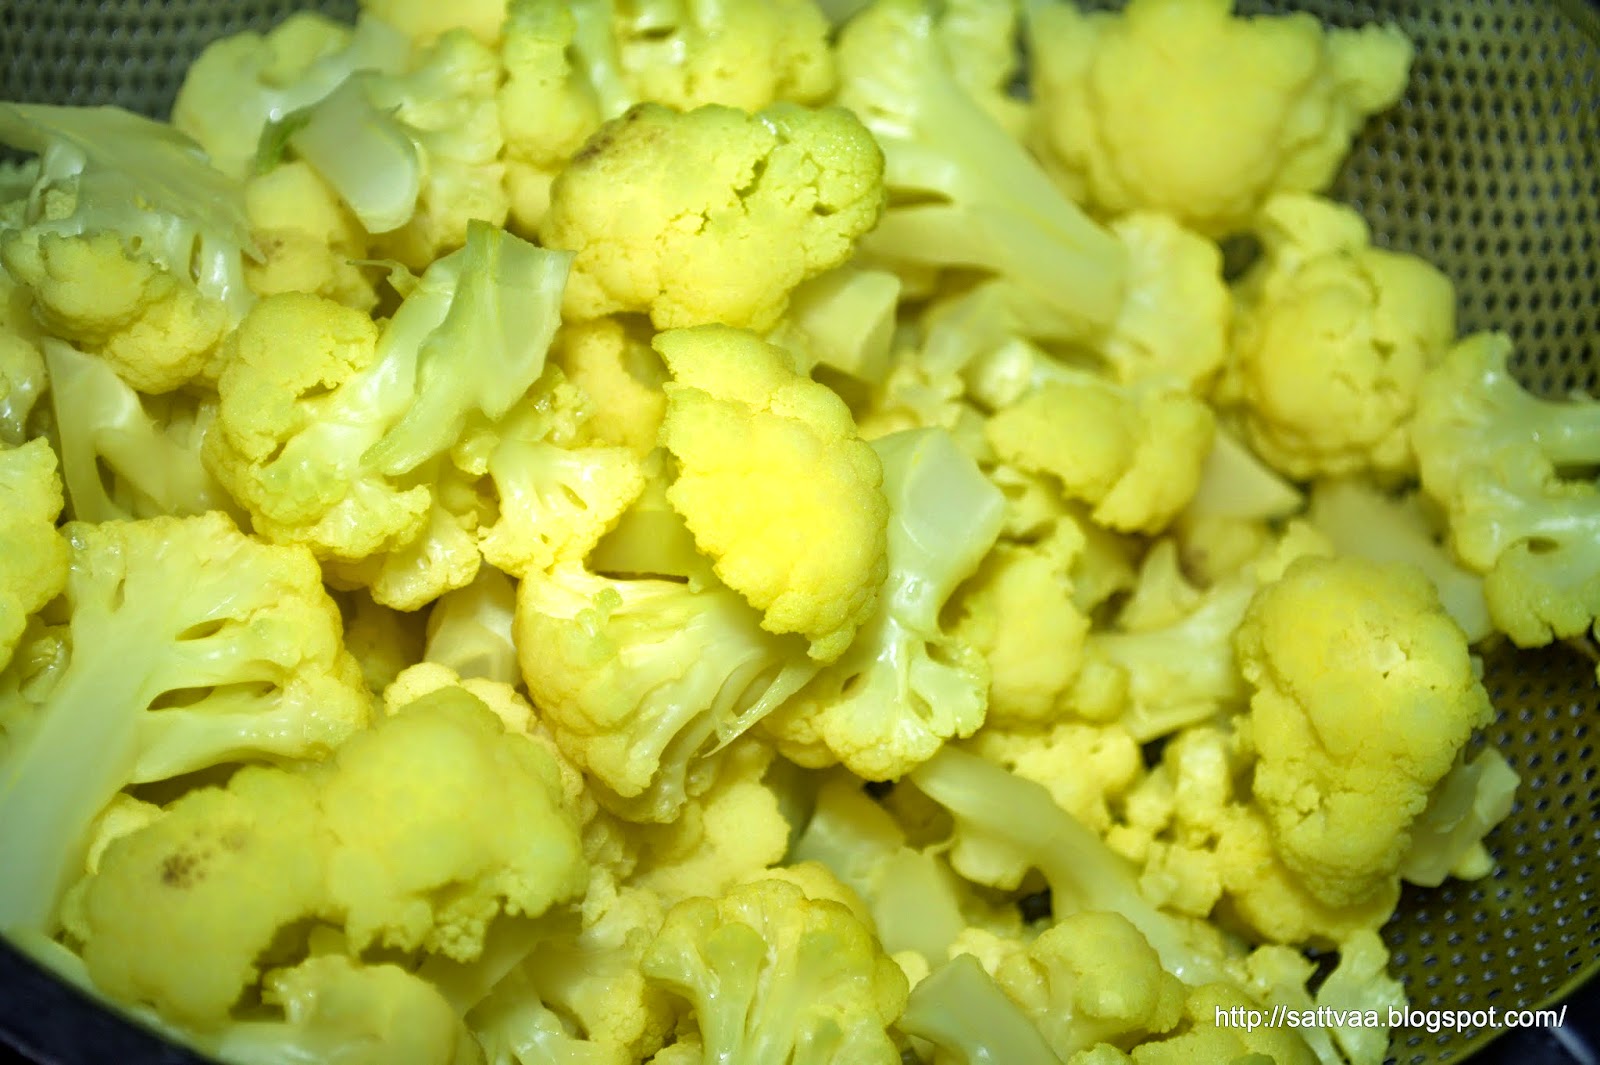
Cauliflower or Gobi is a winter vegetable in India, I find it in all seasons here. Small insects inside the florets are expected norm in Indian cauliflowers and that is why they are dunked in hot salt water before cooking, here the florets are all insect free and ready to use. If inclined, I can even get a chopped and ready to use packet of Cauliflower florets, though I prefer to get a nice, fresh head of the vegetable and cut it myself :-).

No one who cooks, cooks alone. Even at her most solitary, a cook in the kitchen is surrounded by generations of cooks past, the advice and menus of cooks present, the wisdom of cookbook writers" - Laurie Colwin

Cooking for me is all about memories and reminiscing the experiences, every dish I cook brings back something from the past and hence it never tastes the same even if I follow a recipe to the tee. But it is also about making new memories and experiences as we journey along in life, agree?
We went to watch a movie called '100 foot journey' yesterday, DD was reluctant to accompany since it promised to be a gastronomically inclined movie. For all the passion I have in cooking and food in general, my only child doesn't exhibit the same traits. I am a totally positive person and think that she is a late bloomer :-), we will wait and see. While she enjoys good food, she doesn't dissect to smell, taste and enjoy every morsel like I do. On the good side she is happy with most of what she is fed.
Back to the movie, it is full of food, in every conceivable way :-), why not since it tries to show case Indian and French cuisines, right?. There is a funny feud very well portrayed by 2 actors I love to watch (Helen Mirren as Madame Mallory and Ompuri as Papa Kadam), and the rest of the cast is great too. The blaring music, bold flavors and bright colors of Indian cuisine & culture contrasts completely with the subtlety of the French food, and the two groups end up just 100 feet apart from each other. While one is native and established with a Michelin star, the other is uprooted from familiar territory and trying to find a home in an unknown country, the only common thread is food. But food in the two camps is totally desperate in the ingredients, way of cooking, serving etc. War breaks between the two establishments, until Madame Mallory finds the potential in the young cook (not chef mind you!) of the newly arrived family and takes him into her fold. The movie touches Michelin starts (if you are a foodie, you definitely would have heard about this) and the innovations that turn cooking into a science in the race after the twinkling stars. He brings her 2 stars within a year and goes off to bigger adventures (no spoiler alert, go watch the movie if you are piqued :-)). Like Papa says, "breaks do break for a reason", they find their heart's desire in that quaint village and discover compatibility where none seemingly exist at the beginning of the story.
But the movie is also about finding the best mushrooms by the side of the stream in the village, feeling the sea urchin and being able to imagine its taste when cooked, looking deep inside your heart and using the wisdom of generations before, feeling & smelling a spice box that has been in the family for generations, making food with your loved ones and enjoying it. I relate more to this type of cooking than the scales & measurements. I am not averse to invention but I want to understand the taste of the familiar first before I go after the unfamiliar. For me recipes in books do not mean a whole lot until they come into my heart and into my pots (lines shamelessly stolen from the above mentioned movie :-)). I love to cook feeling every ingredient. Whether you spoon in spices (Papa) or sprinkle them (Madame Mallory), ultimately it is all about food that touches your senses and brings you visions of home.
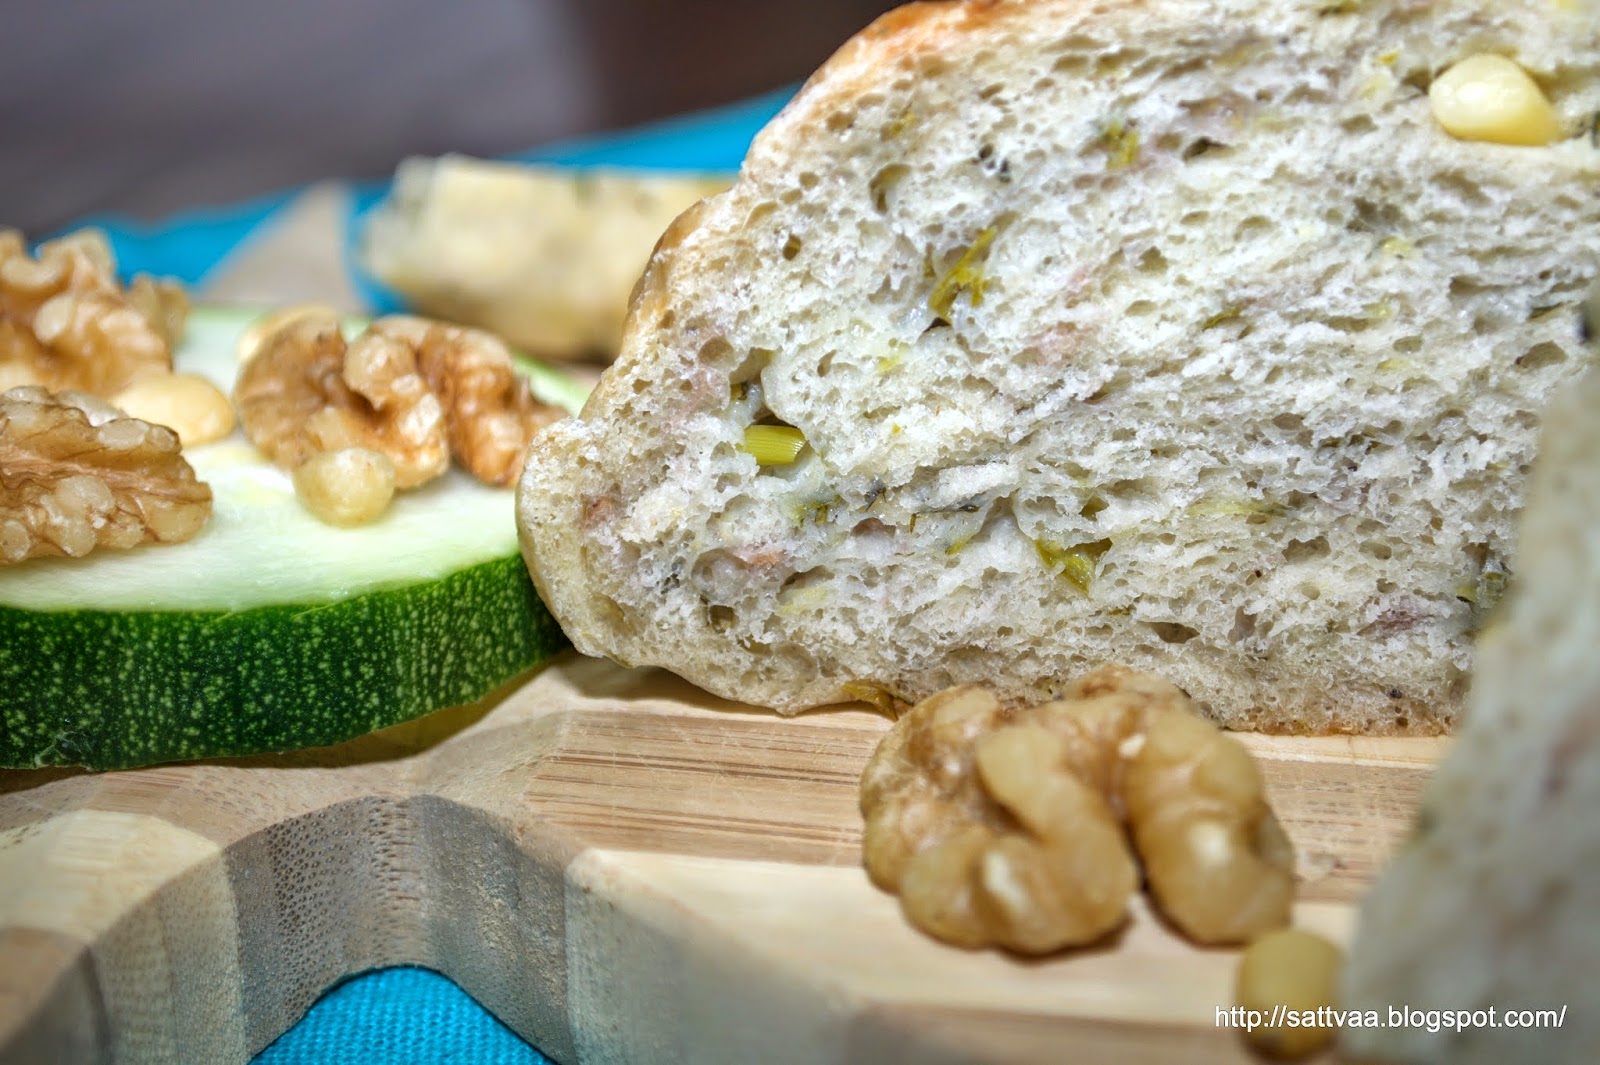
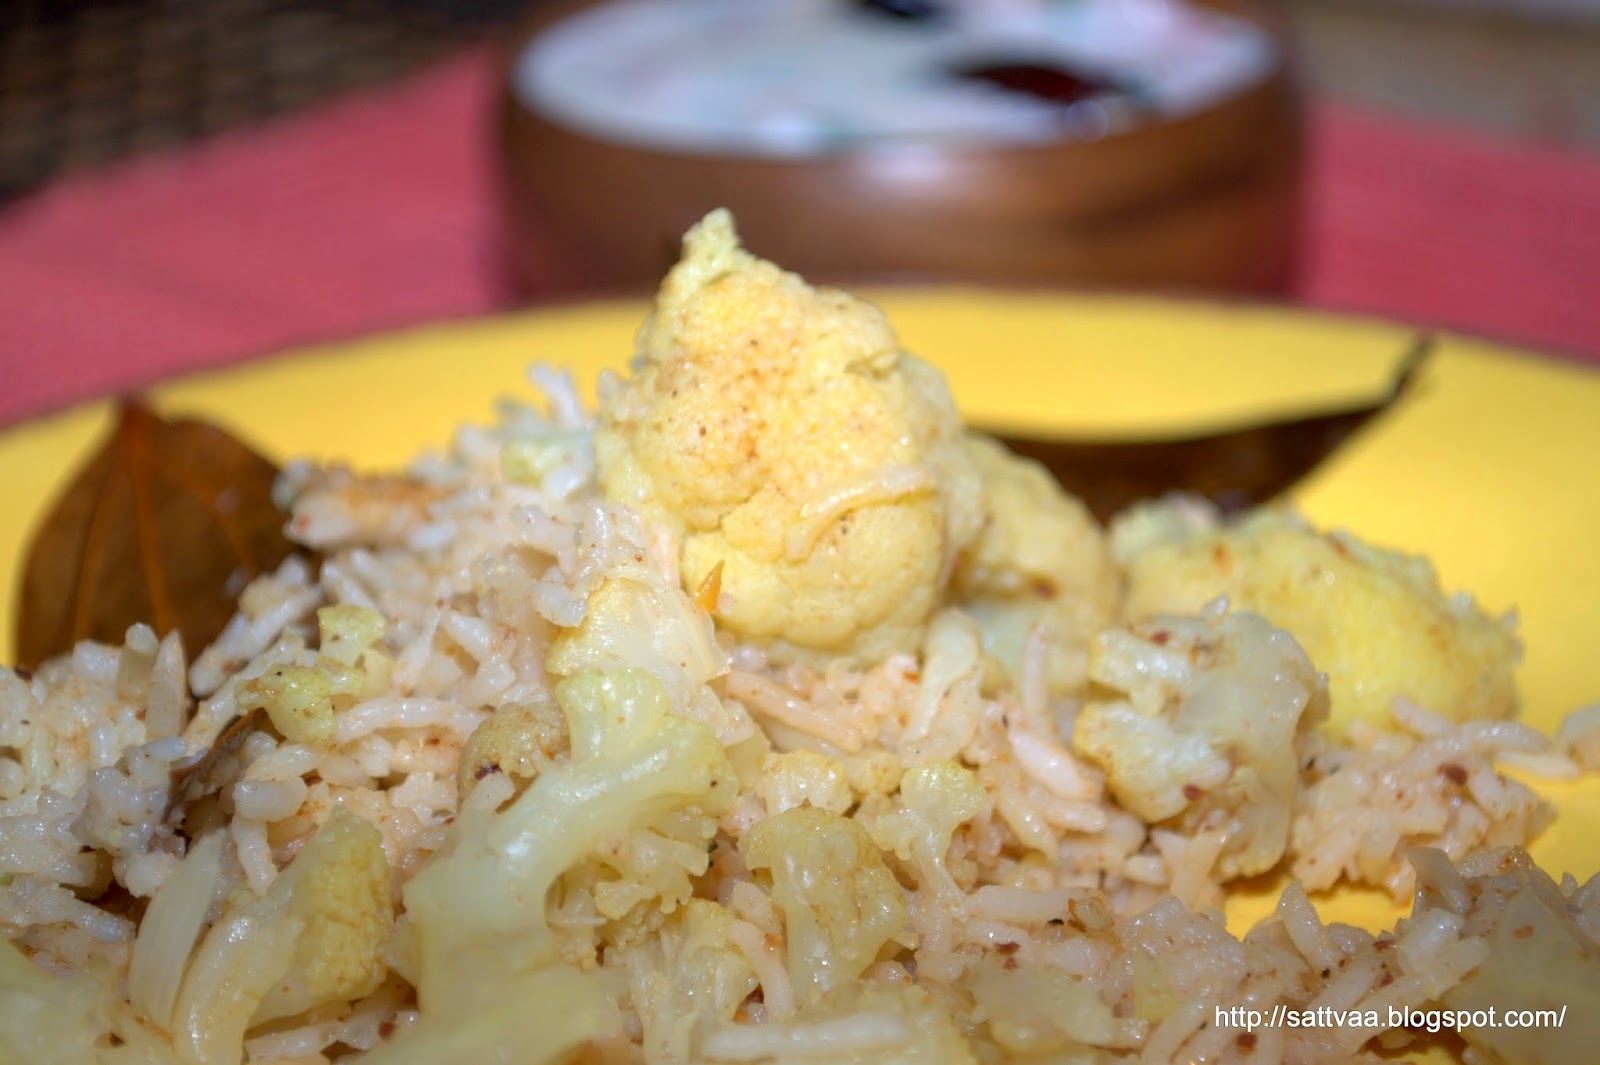
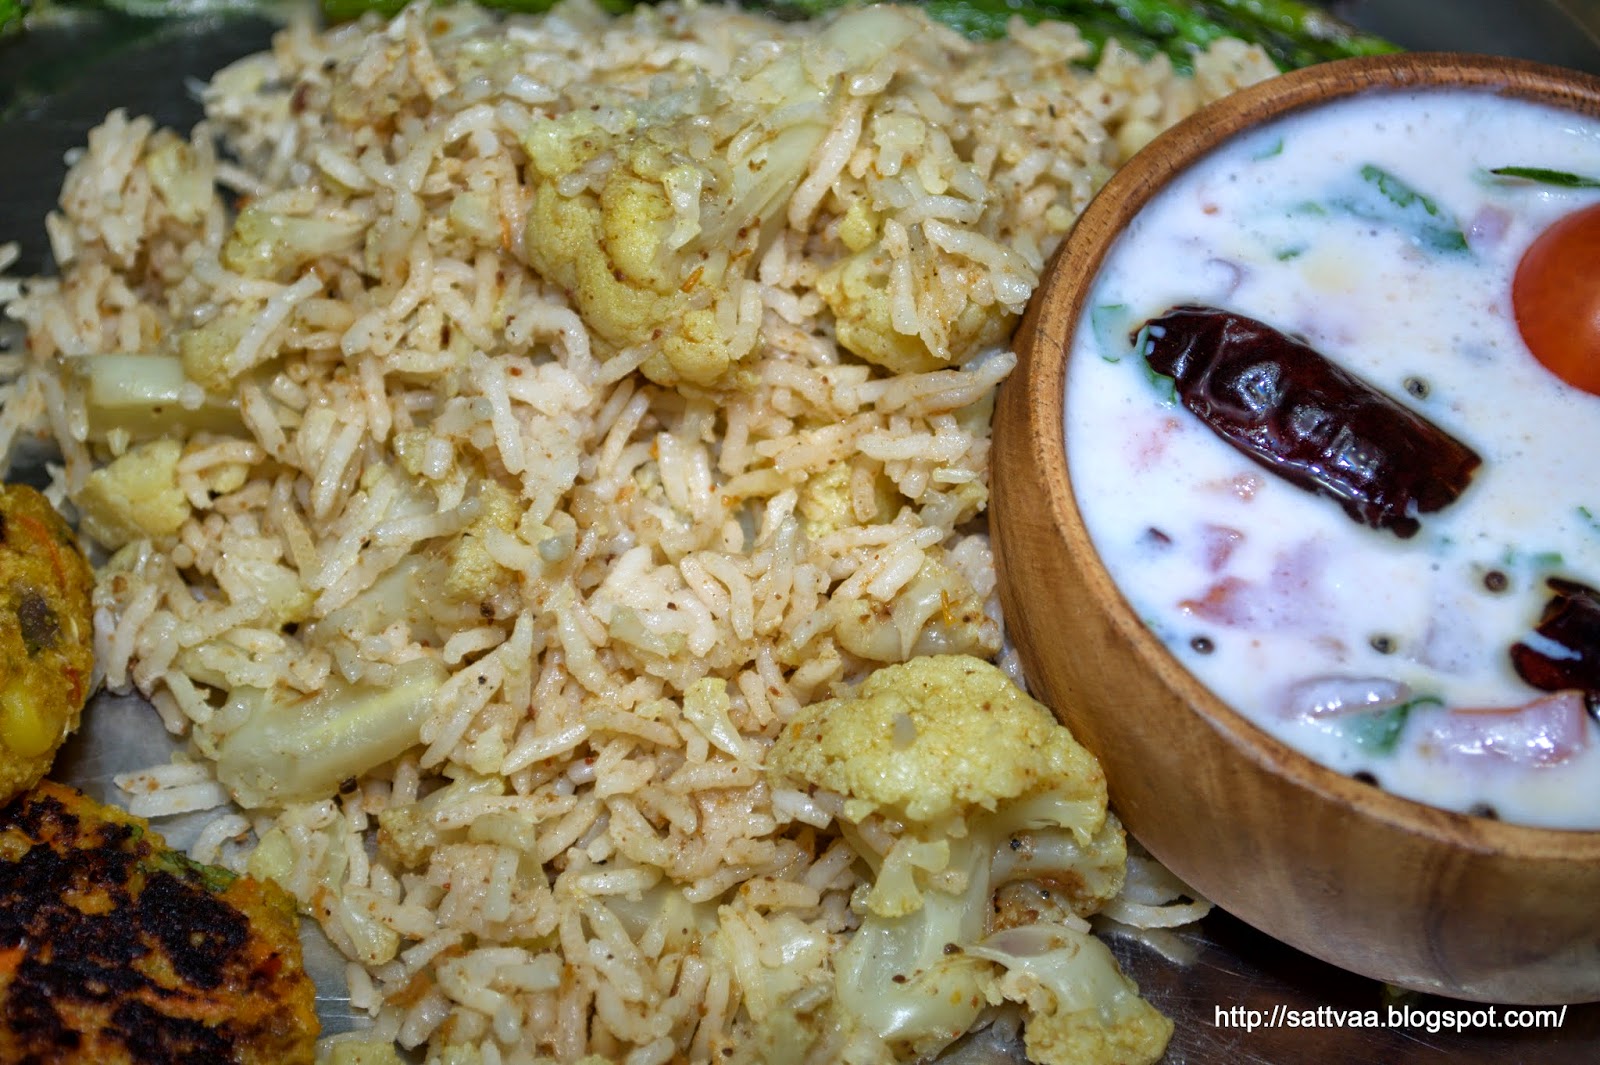
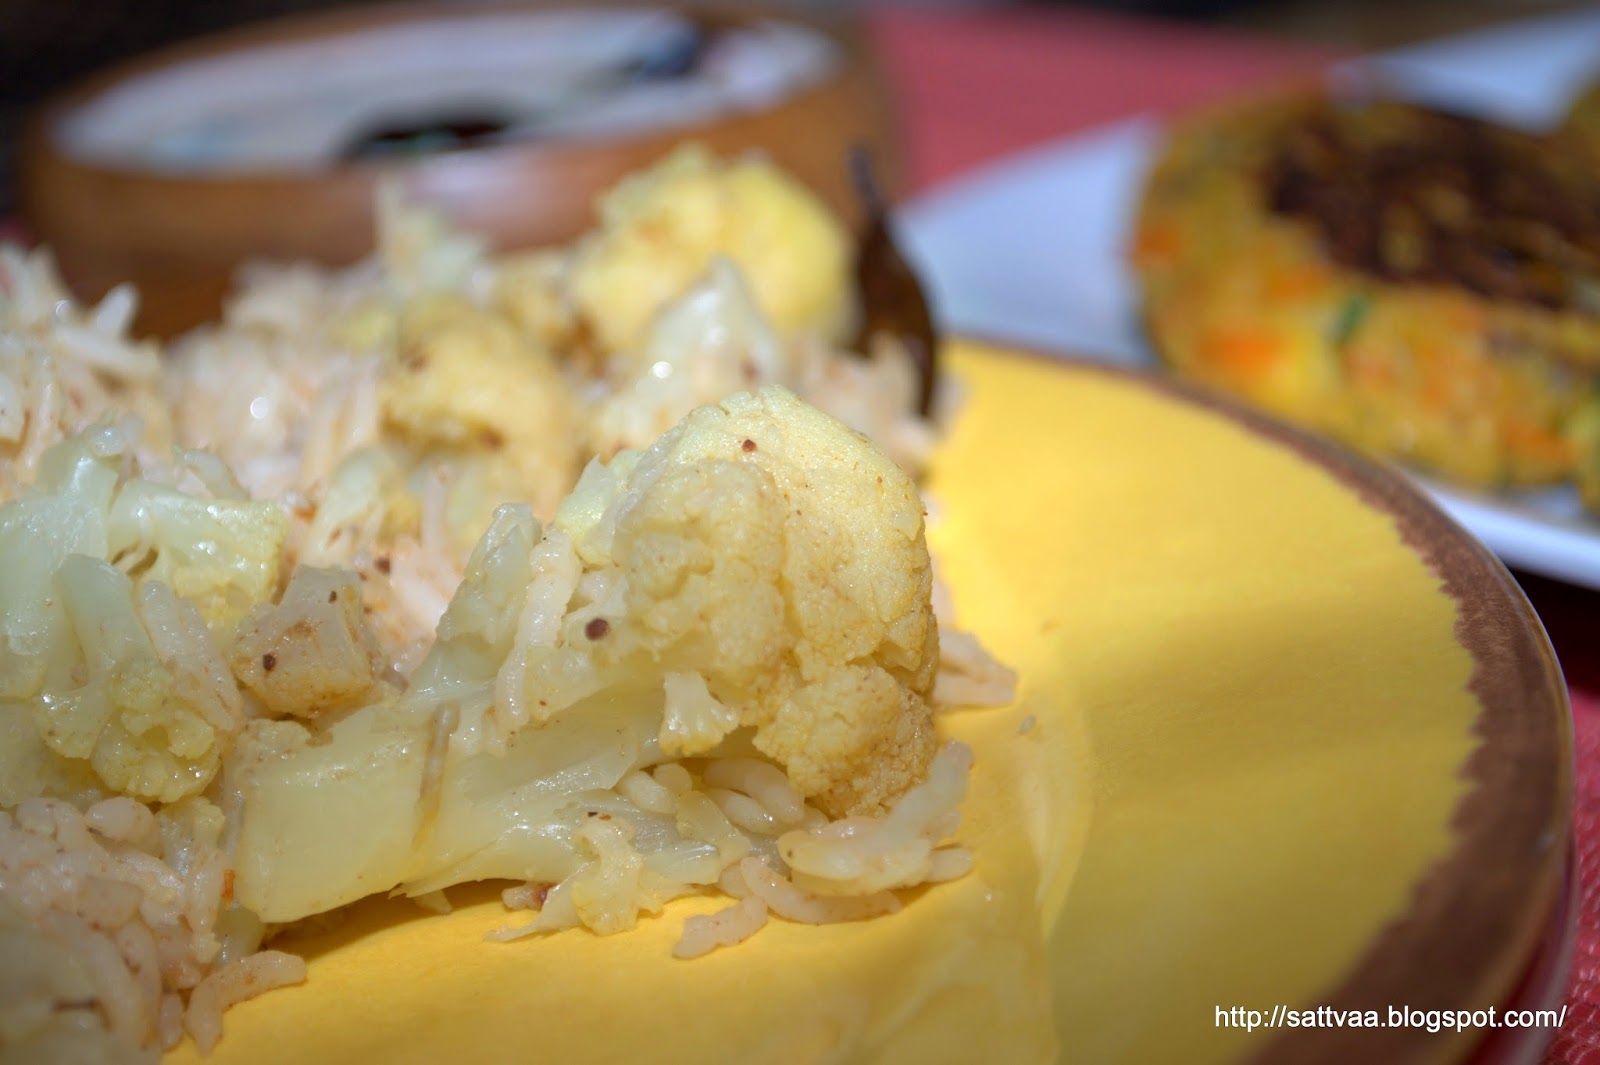
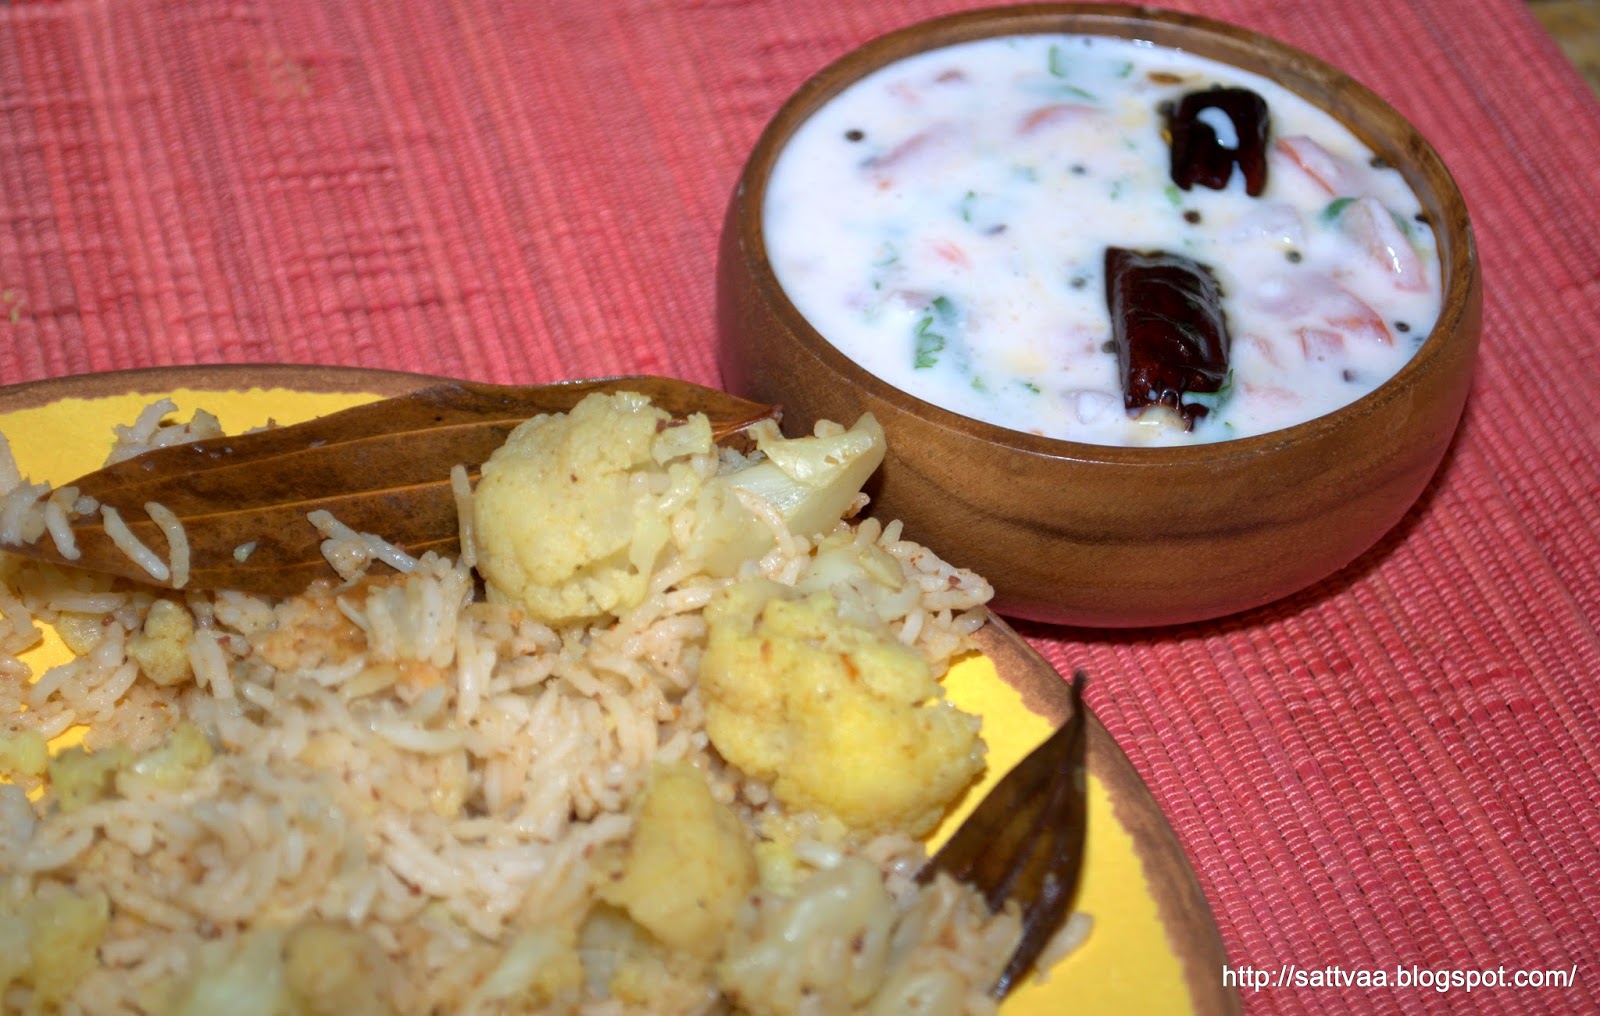
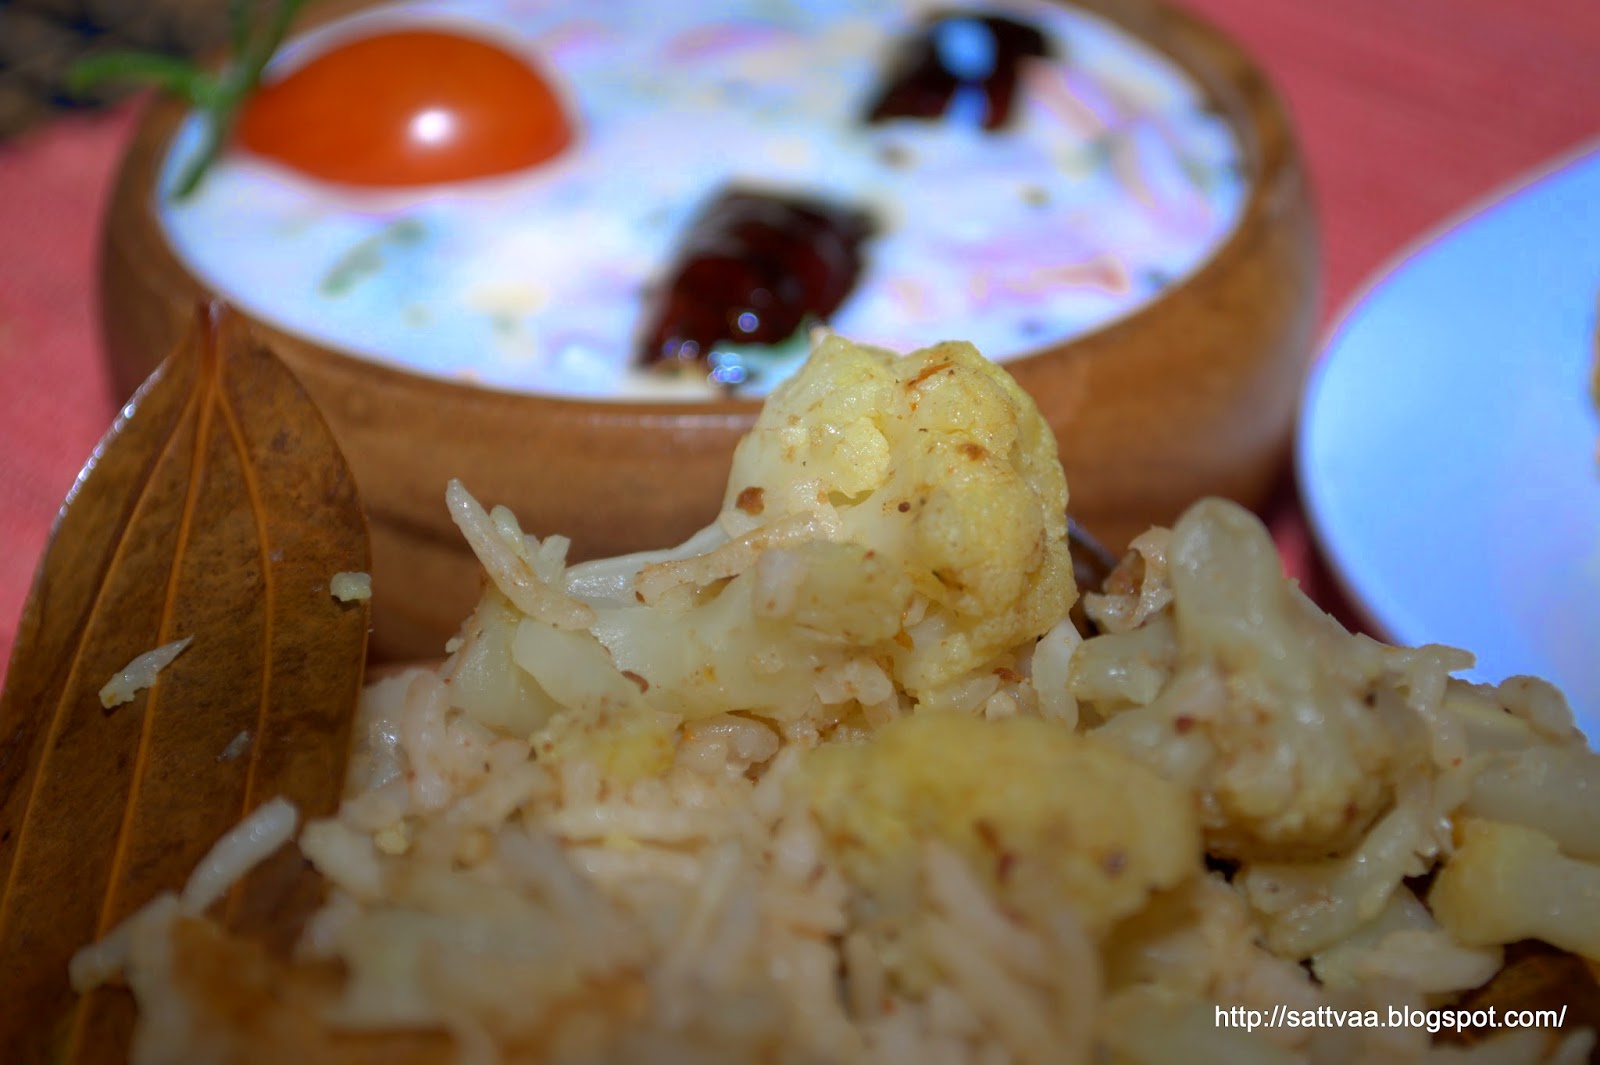
I made this cauliflower bhaath (or Gobi bhaath as we call it) for our brunch yesterday. Like I have said before, this vegetable got into my repertoire only after marriage. Amma makes Gobi bhaath using her 'all purpose podi' which is a family favorite. While I make it that way sometimes, I also make this flavorful bhaath that we enjoy. Spices are mild in this recipe, at best sprinkled (I can see Papa Kadam scoffing at it :-)) and do not over power the taste of the vegetable. Gobi itself is cooked tender but does not fall apart and remains moist with the juices of the masala. It is a perfect lunch box item and a full blown meal if you add a yogurt based raita on the side. I do not typically add potatoes but it is definitely an option.
What do you need to make Gobi Bhaath? 
1 medium sized head of Cauliflower/Gobi
2 cups rice (Basmati preferred)
2 small bay leaves
1/4 Tsp turmeric powder
1 Tbsp salt (adjust to taste)
1/2 Tsp garam masala powder
1 Tbsp oil
To grind: 
i/2 cup onion chopped roughly
1/2 cup tomatoes cubed
2 green chilies
1 inch piece of ginger
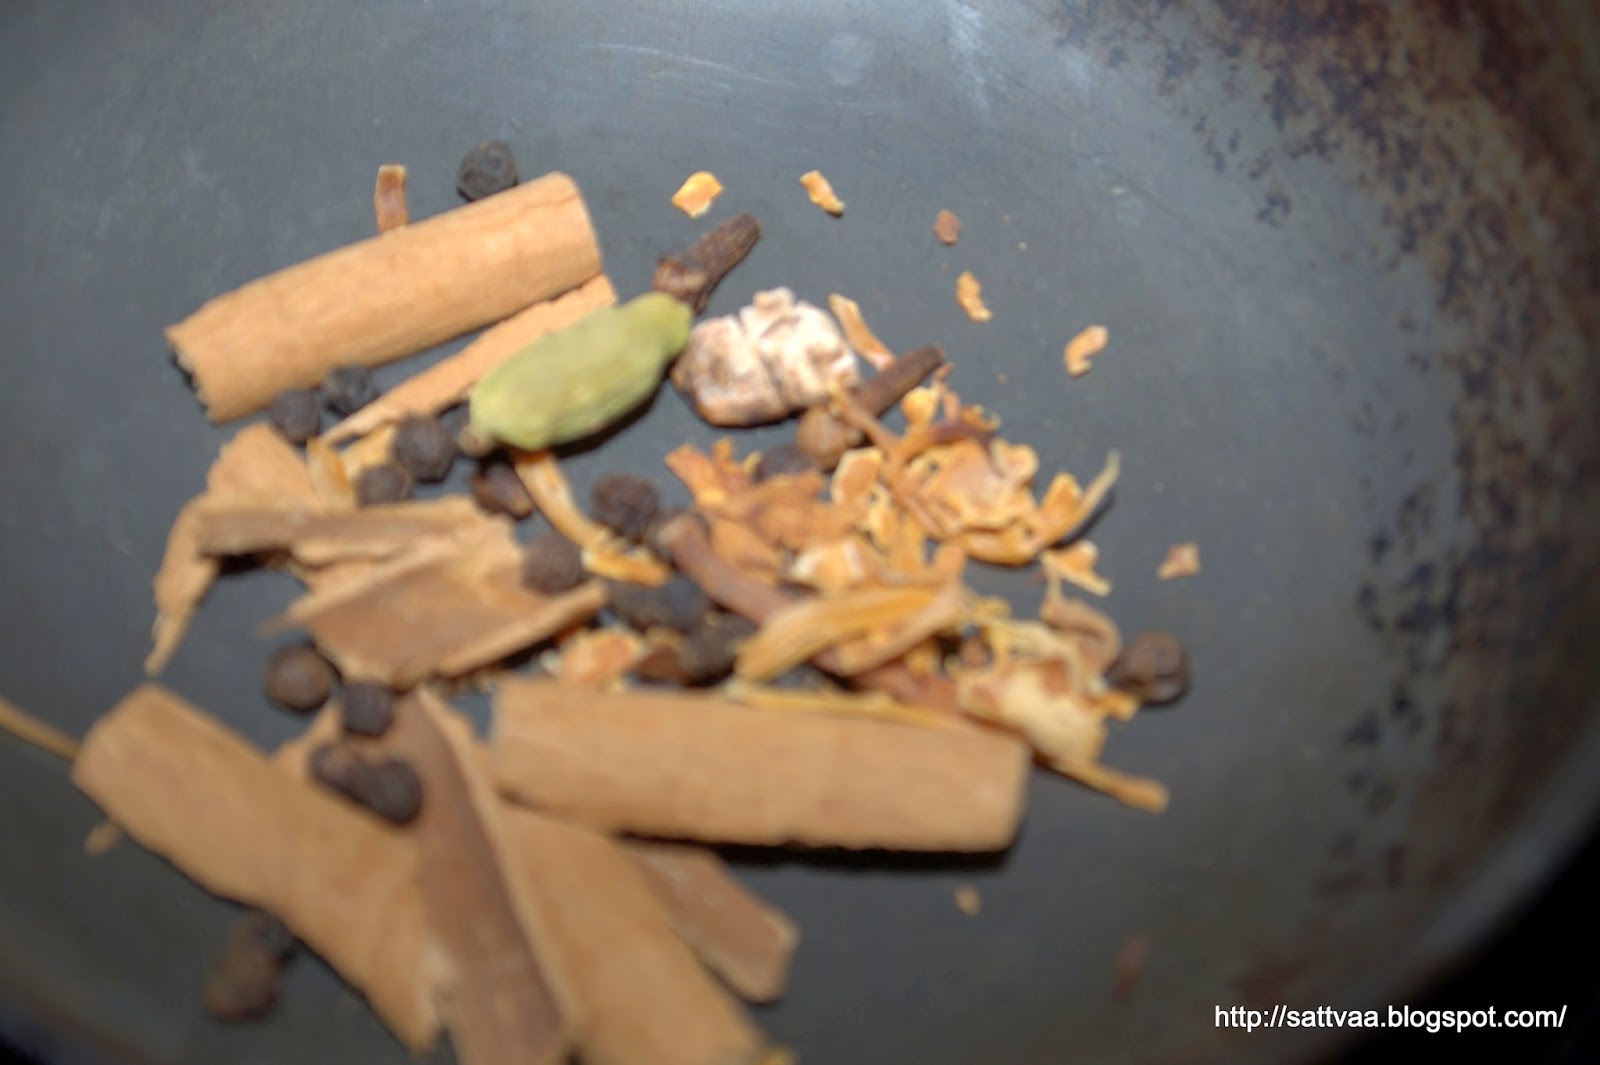
Dry roast & powder:
2 pieces of 1 inch long cinnamon
2-4 cloves
2-3 pieces of mace
1 green cardamom
pinch of nutmeg
8-10 black pepper corns
How do you make Gobi Bhaath?
  • Chop and separate the florets of Gobi. Keep them dunked in warm water with a little bit of salt for 10-15 minutes. 
  • Take them out, clean once under running water. 
  • Soak rice in 4 cups of water for 20-30 minutes. 
  • Take a big pot that can hold all of the gobi, add water to submerge all the pieces, add 1/2 Tsp salt and 1/4 Tsp turmeric powder, cover and let the water come to a roaring boil softening the pieces. 
  • Switch off, drain all the water and keep the gobi until needed. 
  • Dry roast the spices listed under 'dry roast and powder', use a cast iron pan and on medium heat, roast the spices for 2-3 minutes until fragrant.
  • Take them to a blender and powder them coarsely. 
  • Add the rest of the ingredients listed under 'To grind' and make a smooth paste. 
  • Heat oil in a heavy bottom pan or pressure cooker. 
  • Add the ground masala paste and fry for 2-4 minutes or until the raw smell reduces. 
  • Add the par cooked gobi florets along with the bay leaves and mix them well to coat with the masala. 
  • Drain water from the rice, wash it twice in running water and add it to the pan. 
  • Add 3 cups of water (remember the ground masala adds to the liquid content), garam masala and salt. 
  • Stir in gently to mix, cover and cook on medium heat for 15 minutes or until rice is cooked and fluffy. 
  • Switch off and let it stand for 5-10 minutes before using a spatula to fluff up the rice. 
  • Your fragrant gobi masala rice is ready. 
  • I served it with a simply delicious tomato-onion raita made with fresh tomatoes from the backyard. 
Notes: 
  • Take care not to over cook gobi pieces the first time, they will continue to cook along with rice. 
  • Cut gobi into big pieces so they do not disintegrate on cooking. 
  • You can add par cooked potato pieces & green peas to the rice. 
  • Garnish with chopped cilantro before serving. 
  • If you like crunchy gobi pieces in the rice, cool the par cooked gobi completely, roast them in a couple of tbsp of oil until they are cooked and crispy, add these to the rice before serving and fold them in. 

Sunday, August 17, 2014

Zucchini Bread - summer treat perfect for Indian palate

As most of you know we locked up home and went merrily on an India trip recently. While no amount of bribing would have made us trade that trip for something else, 2 things that bothered us were leaving behind Flora in her doggy care for 3 weeks, we had never done that before and the maximum she had stayed out at a stretch had been 4 days of vacation. The completely trusting girl she is, she went in happily with her care taker when BH dropped her off sniffing her food bag we had given, not sure what went on in her mind for the rest of the 3 weeks though. We missed her all the time, hoping and praying she would do alright. She came back home the same day we landed, jumped all over on us and went to sleep in her bed for an entire week getting up only for food :-), she is back to her routine of chasing birds and squirrels all over the back yard now and jumping deftly over my veggie patches to avoid stepping on the tomatoes, zucchinis and cucumbers. All is well!
Ah, those vegetable and flower plants were the second concern, it was summer, basking in the natural flood of light and warmth, the plants were taking shape and sprouting up well as we got ready to leave. The trip was planned last minute and there was not much we could do in terms of preparing, thankfully a cousin who lives in the town offered to come by every few days and make sure the plants were not dry. BH went ahead and put sprinklers for the plants as a backup and cousin P true to his word made his visits and kept the indoor plants thriving, thanks P, we owe you one on this.
We came back 3 weeks later to find 3 big, ready to be picked zucchinis and several tomatoes in different stages of ripening along with a bounty of greens and lettuce that had grown literally crazy :-). There was nothing we could do with the lettuce but pull them out with the roots as the plants were about 4.5 ft tall and flowering, No pictures however as the bad state of backyard didn't give us any time to stop and do the photo shoot. Our friendly neighbor Mr.J swirls his lawn mower into our front yard as he does his yard and BH returns the favor next time around, so while the front looked decent, the fenced backyard resembled a mini unkempt jungle of sorts! All chores taken care of and back to healthy selves, we are enjoying harvesting multiple batches of the veggies. The cucumbers are petite but very tasty, haven't had that taste in a long while, they are almost like the Indian kheera/kakdi, pop them in the refrigerator for a couple of hours, cut and enjoy the cool, crisp bites, it doesn't get more 'locally grown' than this ;-). Not much luck with eggplants though :-(, still waiting.
So, I am not buying any more tomatoes this summer and definitely not any summer squashes or zucchinis :-), I have more than we can eat and distribute, the problem on hand is to find good ways to use them. Dal - done, pachadi - done, stir fry - done, pizza topping - done, veg crab cakes - done, so what else do I make from these really flavorful and yummy zucchinis? With the entire universe at my finger tips (thanks to Google), I searched and found innumerable recipes and sifting through them for vegetarian, egg free, preferably non sugary, the list got considerably small. But I landed on this bread which seemed like a miracle, easy being the middle name and versatile, the tag line of this particular recipe (ignore that completely cheesy talk, I do that sometimes)! But, truth be told this recipe adapts itself in so many different ways that you can create a new taste every time if you wanted and it was a perfect fit as I was looking for a non-sweet version of the recipe. It seemed a tad bit bland for my taste, so I added a little bit of this, pinch of that to personalize it and here it is, a definite keeper especially when it is such a wonderful way to consume those zucchinis.
What do you need to make Zucchini bread? 
Recipe adapted from: http://roxanashomebaking.com/zucchini-bread-vegan-recipe/
1 cup tightly packed grated zucchini (1/2 big zucchini)
2 green chilies - finely chopped
1/2 Tsp grated ginger
1 Tbsp finely chopped cilantro
1 Tblsp pine nuts - lightly toasted
1 Tblsp walnuts chopped - lightly toasted
3 cups bread flour
1+1/4 Tsp rapid rise yeast
1 Tsp salt
1/2 Tsp fresh ground black pepper
Butter to brush
How do you make Zucchini bread? 
  • Wash, remove the ends of the zucchini. 
  • Grate about 1 cup (along with the green skin (it makes for beautiful color and is nutritious)
  • Set it aside for 10 minutes. 
  • Squeeze handfuls of zucchini and collect the water. 
  • I got about 1/4 cup and 2 Tbsp of zucchini juice. 
  • Warm the zucchini juice for about 15 seconds or until luke warm
  • Take the bread flour in a mixing bowl, make a well in the center, sprinkle yeast and add the warm zucchini juice. 
  • Mix gently and leave it to proof for about 5-7 minutes. See alternative way of proofing yeast in the notes below. 
  • Now add the grated zucchini (squeeze out any additional juice if it looks damp), chopped nuts, salt, green chilies, ginger and chopped cilantro. 
  • Bring everything together and hold off on adding water or zucchini juice. 
  • Start kneading to make a dough and zucchini will continue to leave juice. Add the reserved juice only if needed. 
  • Make a smooth dough and knead it for about 6-8 minutes to make a soft dough. 
  • Cover and keep it to rise until it doubles in volume (mine took about 1.5 hours)
  • Pre heat the oven to 375F.
  • Take the risen dough out, punch it down, knead for a couple of minutes and divide into 2 balls. 
  • Let them rest (provide space between the 2 balls to rise) covered for 20-30 minutes. The balls will look fluffier at that point. 
  • Bake for 30-35 minutes (watch the oven for the last 10 minutes as it may vary) or until the top starts to get a nice golden hue. 
  • Take it out and brush it with butter all over and leave it to cool down. 
  • Once cool, cut into slices and enjoy with a pat of butter. 
  • DD loved eating toasted slices with salted butter and a sprinkle of chutney pudi :-)
Notes: 
  • Replace walnuts and pine nuts with any nuts of choice, I used them since I had them on hand. 
  • You can add finely chopped dill leaves or lightly roasted onion but I liked the fresh zucchini flavor and left it untouched.
  • Proofing yeast: If you are not sure of the yeast, it is better to proof it outside. Add yeast to a cup and add the warmed juice with a pinch of sugar, stir and let it rise for 5-7 minutes, When bubbles form and the mixture becomes frothy, add it to the bowl with flour. 
  • Use the zucchini juice as the liquid in the recipe as much as possible to retain flavor, use water only if you run out of the juice. 

UPDATED ON 9/2/2014
One of my friends from work M who is an avid baker and a Zucchini lover herself, not only made this bread with enhancements but also brought slices for me to taste. One of her variations had chopped Dill & spring onions while the other had cheese and jalapeno in addition to the ingredients listed above. Both tasted delicious. Total euphoria for the blogger in me :-) and I went ahead to make another batch of this yummy bread, adding oil roasted chopped onion and dill leaves, doubled the quantity of nuts and the result was a super delicious loaf (well, 2 loaves) of zucchini bread. We are enjoying it with a topping of pickle :-). So if you want to make this bread super flavorful, roast 1/4 cup finely chopped onion, 2 green chilies and 1 cup of chopped Dill leaves in a Tbsp of oil until onion becomes limp and Dill gives out a wonderful aroma. Let cool and add this to the dough along with grated zucchini. 

Monday, August 11, 2014

Kobbari Mithai (Coconut Burfi) - Simple, Succulent and fit for all ocassions

Hope you all had a good weekend, for many of us this past weekend was festive. First came Varalakshmi Vrata (worshiping Goddess Lakshmi) on Friday and then it was Raksha Bandhan or Rakhi (festival to celebrate brother-sister bond) on Sunday. This month infact is full of festivals if you are inclined to celebrate them all. I combine some, move some to the weekend for convenience so all of us are at home but whenever we do celebrate it is a whole hearted affair. Anyways, we did the pooja and then had a great lunch on Saturday. As far as Rakhi goes, DD met her brother a few weeks back when we were in India, bought a Rakhi and instructed him to tie it on himself when it was time to do so(very much like a post dated check), but made sure she got a gift right then and there(nothing post dated about it), she is one smarty pants :-)
I started doing Varalakshmi Vrata after I got married and most years amma has been with me, when she is not here she makes sure to send emails in advance reminding me of the upcoming festival and asks me without fail what I would prepare for naivedya (offering to Goddess). Also, I get told every year that I should make atleast 9 different varieties of dishes :-). Since she wasn't here this year, I asked BH to help me on selecting menu and he promptly rattled off things which were either his favorites or dishes we normally make for festivals. As I vetoed most of them on the very flimsy excuse that it was already on the blog, he gave up and scooted leaving me alone to plan my menu. I use my bus rides to & fro office to plan things which ranges from the day's dinner to DD's activities which is exactly what I did in this case and came up with 9 items, some of which were not on the blog yet :-), problem solved.
Kobbari Mithai is one of nammamma's many signature dishes. By that I just mean that I haven't come across any other that matches the taste and quality. I know most of you will be going at this time, "My mom makes it the best", that is the feeling I have and I am willing to go to the length that all moms make the best food. It is just her attention to detail even in a really simple recipe that made it special. This dessert is just 2 ingredients if you do not count the sprinkle of cardamom and smear of ghee on the plate but she would always make sure only the white part of the coconut was grated to maintain the pristine color of the mithai and the pieces were cut uniformly with precision :-).
I made the kobbari mithai this past weekend and it turned out so perfect that it was almost like nammamma had made it :-), elated over the success, I told her that night as we were chatting and here is how the conversation went..
Amma: "Did you use fresh coconut?"
Me: "yes, amma, I broke a coconut, grated it myself and used it".
Amma:  "Did you remove all the brown parts?"
Me: "Yes, I didn't even get to the brown part while grating the coconut", she does a happy grunt (that was a trick question and I know my amma can be sneaky like that)
Amma:"You didn't use the dry coconut, right?"
Me: "no, I even gave the coconut water to your grand daughter to drink, it wasn't dry coconut"
Amma: "Yes, that is how it should be done for best taste though it takes less time if you make it with dry coconut"
Me: "I made it fresh and it took me 20 minutes to finish"
Amma (with total disbelief): "What? 20 minutes?"
Me(showing off): "Yes, I made a small quantity and was done in 20 minutes. Not like you, breaking 10 coconuts at a time" :-)"
Amma (very thoughtful): "hmm, your generation is like that, everything gets done quickly" :-)

I don't think she really believed me on that 20 minutes since she has never made such small quantities in life and doesn't understand them.

So even though it is called Kobbari (refers to the dry coconut in Kannada) mithai, it is usually done with fresh coconut, keep that in mind. And nammamma never added milk or water and the burfis stayed fresh longer. When made correctly, these are juicy yet dry to touch, succulent but not syrupy and have a wonderful taste of coconut and sugar. Give it a try and check it out yourselves, the only problem I had with the color of the mithai was that I ended up with not so good pictures :-(

I have a traditional savory item coming up next. It is very popular but I am making it in a short cut way(no store bought help). It is there in the picture, see if you can spot it and let me know.
What do you need to make Kobbari Mithai? 
Makes about 16 1X1X1 inch pieces
2 cups lightly packed grated coconut (fresh is preferred, use frozen as a second option)
1.5 cup sugar
1/4 Tsp freshly powdered cardamom
1/2 Tsp ghee to spread on the plate
How do you make Kobbari Mithai? 
  • If you are using a fresh coconut, scrape/grate it to get the white portions of the meat only, once you start to see the brown shell from inside, stop scraping. 
  • Measure two cups of coconut into a thick bottomed kadai or vessel. 
  • Add 1.5 cups of sugar and mix the two together.
  • Switch on the stove at medium heat. 
  • Keep stirring frequently to avoid sticking to the bottom of the vessel. 
  • Within 5 minutes, sugar melts and the mixture becomes liquidy. 
  • Continue to stir, scraping any that sticks to the walls of the vessel and bring them together. 
  • Within 20 minutes (for the given quantity), the water evaporates and becomes a single mass. 
  • Prepare a plate by smearing ghee on it. 
  • Pour the coconut+sugar mixture onto the plate and immediately flatten it to the desired thickness using a flat spatula.
  • Sprinkle cardamom powder on top and press it down lightly. 
  • Let cool for a minute and make marks with a sharp knife to desired shape and size - do not go all the way to the bottom of the plate but leave just a tad bit shy of it. 
  • Once it cools down completely, you can break the pieces with the knife or just with your hands cutting them apart at the markings.  
Notes: 
  • If you are using frozen coconut, defrost and bring it to room temperature. 
  • Sugar I get here is fine in texture which helps in speeding up the process, if you are using sugar (the ones you get in India are coarser), you can run it in the blender to powder and then use it in the recipe. 
  • You can double, triple this quantity to make more, be prepared to also increase the time you spend at the stove. 

Sunday, August 3, 2014

Maddur Vade - Memories of a train journey and a delicious snack from a tiny town along the tracks

I really didn't plan on taking a month long break with my blog baby or plan to stay away from chit chatting with you for so long. Things just happened, a week of preparation to go to India, 3 weeks of exhausting but "totally will not miss it for the world" stay in India and a week to fight all the throat and other infections we picked up. That sums up the very rejuvenating vacation in a crisp and concise sentence. But I am sure you know that I will not let you all go that easily and would rather regale you with the details of my trip and make you all a part of the journey :-), so be prepared, and resign yourselves to my many accounts of the India visit over the next few posts.

Where do I begin? I really can't fit my 3 weeks of happiness into this flimsy post, so why don't I jump to what is relevant to today's post?
A quick note on the recipe today, I had made this maddur vade last month when it was the beginning of Summer and we had a week of sudden thunderstorms and showers making the weather perfect for something spicy, crispy, and ofcourse deep fried :-). I had even finished up the draft, selected the pictures and saved them onto my laptop in a neat little folder with a very noble intention of completing it and posting while in India. And then other things took priority and I completely ignored my little virtual space. And I have grown to respect all the bloggers who actually plan and schedule their posts while on vacations and work through bravely with bandwidth issues and power cuts, I lack that level of dedication. But I think I have a better story to tell now after the trip and hope to do justice to this ever popular, very unique (to Mysore region) evening snack that is bound to fill your heart with contentment and leave the taste buds satiated.
Maddur is a small town about an hour from Bengaluru and lies on the Bengaluru-Mysore highway. It is known for its tender coconuts and ofcourse Maddur vade. Long back (seems like it) after my graduation, I spent a little less than a year in Bengaluru as a working woman. That was my first time out of home stint in the 2 decades old life and I was trying to not show my apprehension of staying away or how much I missed home. I would wait for the weekends to come and I would be on the train on late Friday evenings or early Saturday mornings depending on when I could get away from work, looking forward to the familiar house, polishing off amma's food, sitting by anna's bed side and talk non stop about the week, playing with the little nephew and obviously going around my home town in my reliable old Luna.
Train journeys are a world of charm, to this day I love the Indian railways and cherish all my trips. They may not be as timely as some of the western countries railway systems are, it might still be a pain to book tickets online in India but there is an unexplained joy in the train rides especially the open windowed 2nd class rides. Yep, I personally prefer these rides to the all enclosed, air conditioned compartments. There is a bonding that happens in these rides - strangers becoming friends, home cooked food shared without hesitation and private pains and pleasures made public in a matter of few hours.
While the Friday evening trains used to be full of office goers returning home, Saturday morning rides would be a mixture of weekend travelers and some regular commuters that worked 6 days a week instead of 5. Being a young person, fresh out of college without a care in the world, I used to sit in those trains surrounded by many older and wiser aunties and uncles who spent the 1-3 hours (depending on where they got off) planning their days and trying to work out any family issues that needed attention. Many aunties would buy fresh greens and vegetables on the way and prepare them for the next dinner or lunch :-). These trains didn't stop for very long at any station and so all purchases would be done in a matter of few minutes when the train stopped. As it slowed down, you would already have vendors of all sizes and shape jumping into the train or reaching out from the windows with their goodies. Credit cards were unheard of, business was strictly by cash and exact change was always appreciated (thank you very much :-)) but if you were a regular customer, you could also say that you will give the money next day/week or whatever and credit would be applied to your account. I am always impressed with the mental calculations and account keeping acumen of Indian street vendors which seem to allude many big businessmen.
Anyway, since I didn't have to worry about keeping a house or planning a dinner when I got home, my eyes & ears would be tuned to the sounds of the hawkers selling Maddur Vade, that was the only thing I craved for and bought on the way. About a half dozen warm vades, packed deftly in old newspapers and dry leaves that stayed warm until I reached home a couple hours later to be shared with the family as we sat down together to catch up on the week gone by. The best of any food is when you share them with loved ones and the maddur vades just increased my joy of reaching the safe haven of home and that is how I always remember them.

Years have gone by, I don't make that train journey any more since there is no home any longer at the end of that ride nor or the people that made my home. I have consciously avoided going back to Mysore in the recent years, I know there is a flood of emotion bottled up inside rearing to get out when I make that trip but I am just not ready for it yet. So, I can't tell you if anything has changed if you were to take that train from Bengaluru now, I am sure things have changed just like every where else but I really hope the core of that journey still is present and gives the same 'home bound' happiness to every wandering soul. Stop and eat a Maddur vade on the way, it only adds positively to the experience.
I started making this dish at home many years back and one of my aunts taught me the trick of steaming the maida/all purpose flour before making the dough. This makes the vade crispy and flaky (just like the ones you get in the train stations) and stays like that without becoming rubbery or chewy if you were to use the raw AP flour. If you haven't noticed, it is called 'vade (eh)' and not 'vada (ah)' in the town of its origin and that is how it is familiar in the region.

On a side note, we had a small get together while in Bengaluru and had invited a few friends, the food was catered and while deciding on the menu, I jumped at the mention of Maddur vade on the menu card and added it to the list. However, it was a very oily and totally disappointing maddur vade while the rest of the food was really good. Just goes to show that this snack should not be taken for granted though it is easy to make. Follow the correct procedure if you want great results.

What do you need to make maddur vade?
Makes about 15
1 cup maida
1/2 cup chiroti rave/fine sooji + 1 Tbsp
2 Tbsp rice flour
1 Tbsp oil + oil to deep fry
1 cup finely chopped onion
10-12 curry leaves - finely chopped
1 Tsp salt (adjust to taste)
4-6 green chilies - finely chopped or crushed into a course paste
How do you make Maddur Vade?
  • Put maida/AP flour in a vessel, cover it with a plate and steam it for 10 minutes. This makes the maddur vade crispy without being chewy. Make sure water doesn't get into the vessel. 
  • Once the maida cools a little bit, add it to a wide bowl along with 1/2 cup of sooji and rice flour. 
  • Break any lumps formed in the maida using fingers and fluff up the dry flours. 
  • Add finely chopped onion, curry leaves, salt and green chilies and mix well with a firm hand to make onions let out some juice. 
  • Heat 1 Tbsp of oil until hot and pour it on top of the flour mixture. 
  • Mix everything together with a spoon and let it sit for 10 minutes. 
  • Now, using your hand mix all the ingredients together and bring them together into a tight dough using water. 
  • Use water very cautiously (I needed only about 2 Tbsp), the amount depends on the onion and the juice it lets out. 
  • Knead for just a minute and break the dough into small lemon sized balls
  • Prepare an aluminium foil or plastic sheet by spreading a few drops of oil and pat the dough ball into a thick (about 2mm) disc. 
  • Sprinkle little bit of chiroti rave on top and press it down with the palm for that authentic finish. 
  • Meanwhile, heat oil in a pan to deep fry. 
  • Keep the heat on medium and gently lower as many discs as possible (without piling them on each other) into the pan.
  • Fry them on low to medium heat (takes about 8-10 minutes for a batch to cook), flipping them over to get them to a golden yellow color on both sides. 
  • Take them out to a plate lined with tissue and let them drain completely. 
  • Serve warm with a cuppa. 
Notes: 
  • Maddur vade is thick and has a flaky texture, it is never crunchy/crackly. 
  • Cooking them on medium heat ensures a uniform and thorough cooking and keeps them crispy without becoming chewy. 
  • This is usually on the spicier side with a liberal dose of green chilies but use them to taste. 
  • A slightly watery coconut chutney is a great combination for maddur vade but you can use other dips (or no dips) of personal preference.