Sunday, April 27, 2014

Kadle bele chutney (Chana dal chutney) - Ajji's (grandmother) chutney

Looks like I am finding my frequency of posting to be once a week :-), I don't want to repeat myself with the same stale excuses for absconding, so I will not do it today. if you miss my rantings, go ahead and read some of the recent posts to know what is happening. Instead today, I have a really simple and lip smacking chutney recipe that has been a favorite from childhood. There is no big secret here but I haven't seen this chutney made in many homes and since I love chutneys of all shapes, forms, colors, etc.. I think this deserves a space on the blog.
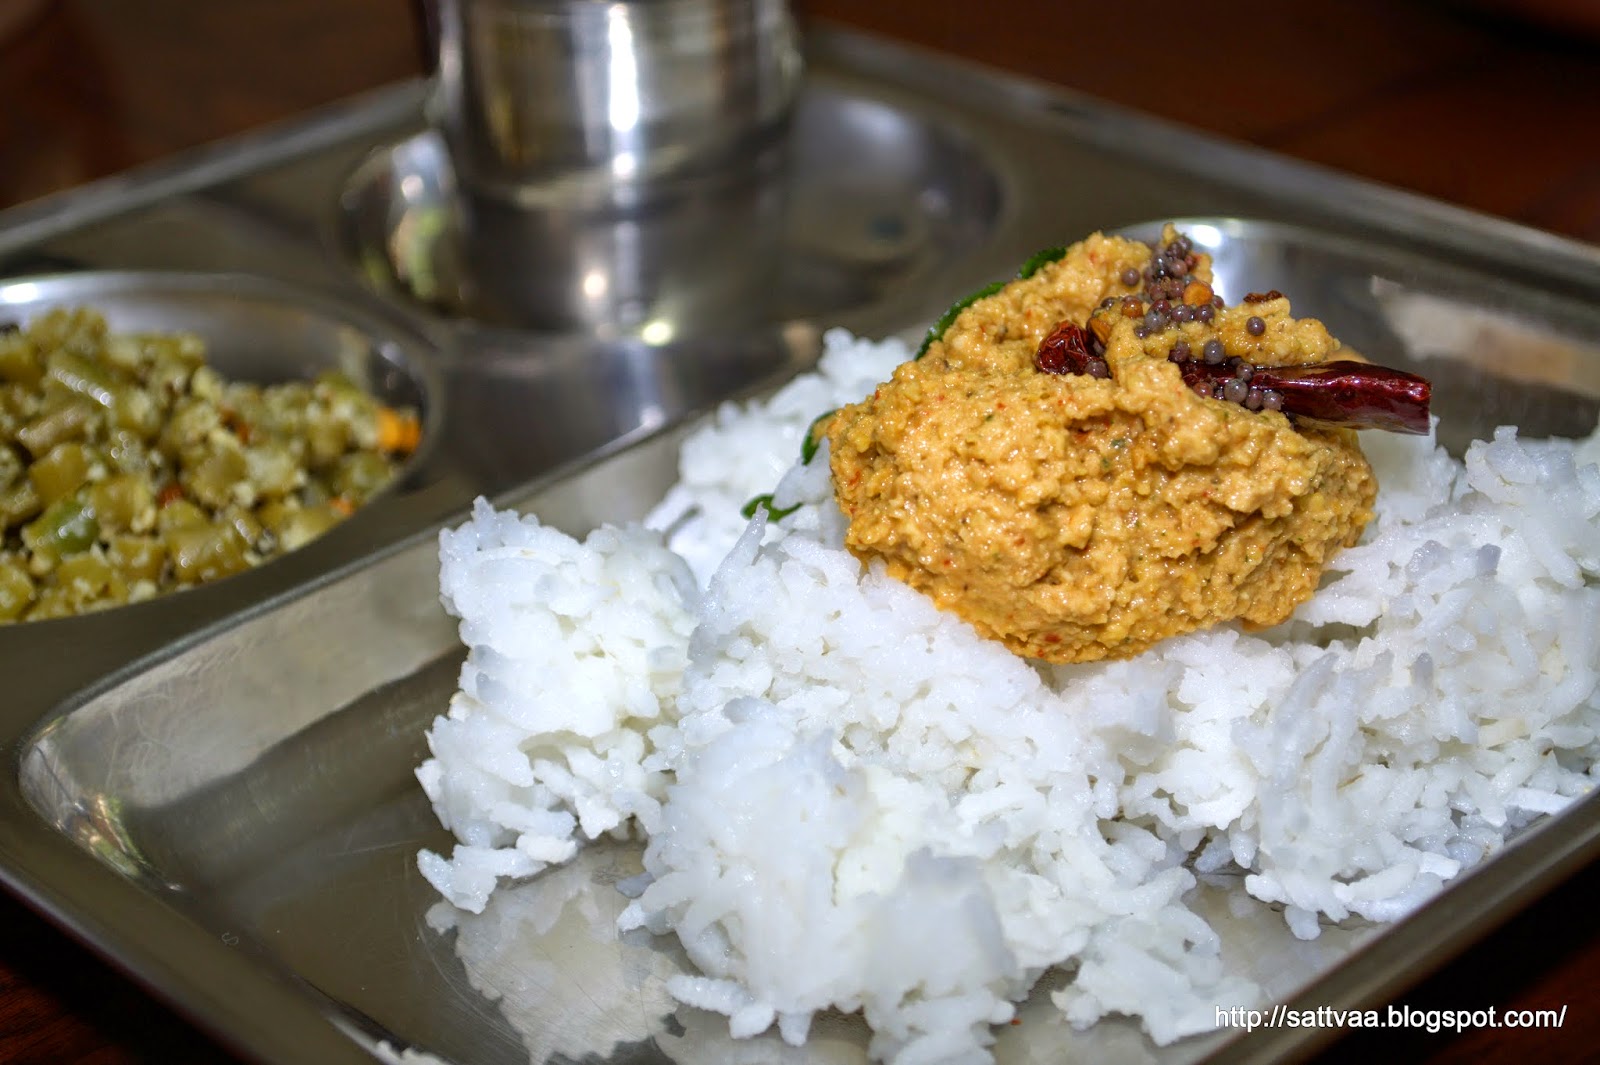
If you are not a chutney (or pachadi or thogayal or chamanthi) aficionado, here is something you need to know. There are 2 kinds of chutneys - one is used as a dip mainly (with idli, dose, chapati, or chats) and another which is coarsely ground and used to mix with cooked white rice. The first kind is usually smoothly ground and slightly watery while the second kind is coarsely ground with less water. Today's chutney is of the latter variety, it doesn't mean you are prohibited from using it as a side dish for idli or dose but it is best when eaten together with steaming white rice and a side of piping hot saaru/rasam, that is the ultimate description of a comfy, homely meal or it could be the opinion of a die hard chutney fan. Did I ever tell you that I ask for a chutney on my birthdays when amma wants to cook something special :-), She was taken aback by the request the first time but now she knows the crazy DIL enough to understand that spicy chutneys are way on top of my list when it comes to food rather than any boring sweet, so I get a chutney on my birthdays whenever she is here :-).

We had an elderly couple live next door in Mysore for a few years. With grown up children living away, they led a retired life and had very predictable days starting with Tata (grandpa) reading his morning news paper from top to bottom while ajji (Grandma) ran around the front yard doing her daily pooja etc. Both of them used to have some juicy exchange of conversations and lovely, harmless banter that was born out of the familiarity of having spent over 4 or so decades in each other's company.  I loved the way ajji dressed up impeccably every morning and would come to water her Tulsi (Holy basil) plant in the front yard. She and nammamma would chat for a while if they saw each other and then go about their chores. Tata was not much of a talker, seemed like a grumpy grandpa but we discovered the jello like heart only over time. He would be all soft and squishy when the grand children came visiting. Ajji was very fond of my mother and they used to share their recipes over the compound wall that separated the 2 houses and many times a small dish would exchange hands too :-).
Summers in India are known to be not just hot but also made some what intolerable to the people that had to stay home without electricity as power cuts (both scheduled and unscheduled) were rampant. On one such Summer days, ajji had made plans to make lunch of anna, saaru & chutney - this is a very, very typical kannadiga fare at home, you would make a chutney if there were no veggies or you just felt like having a light meal. The power went out in the morning but never made it back even as it was nearing lunch time. Tata was losing patience and from what we had seen he was not a person used to eating just anna-saaru for lunch :-). Those were the days when blenders ruled the kitchen and most new homes would not have the traditional stone grinder in the kitchen as it was becoming obsolete. My dad (ever the planner) always made sure that our kitchens had a stone grinder installed in a corner no matter how fancy the times were. We were the only house with a stone grinder in that street. It was rarely used and was usually kept covered to reduce dust setting on it and had to be cleaned and washed thoroughly whenever nammamma decided to grind something by hand. Ajji knew about it and after a quick message across the wall, she came home holding a plate covered with a bowl on top.

She had roasted all the ingredients for the chutney and was waiting since morning to grind it in the blender as soon as the power was restored, but since Tata was getting hungrier and impatient by the minute, she decided to grind it in the stone grinder. Nammamma wouldn't let the old lady sit down on the floor and grind the chutney, so the strong and young person who was loitering at home on that summer afternoon was commissioned to do the manual job which I didn't mind at all :-). Ajji sat on an iron chair in the kitchen and made sure she gave me instructions to grind properly and told me to stop at the right time - yep, it has lots of specifications that the chilies had to be ground well but the chana dal should be just coarse for it to taste right :-). When it was done and I had picked all the chutney into the bowl she had got, she asked my mom for a small cup and dropped a little blob of the chutney into it for us to enjoy :-), it was one of the tastiest chutneys I had eaten (I know I say this to all chutneys, but.. ). Though nammamma made the same chutney, it was the first time I had paid attention to the ingredients and the texture as I was grinding it and probably loved it more because of it.
I remember it as Ajji's chutney since then and here comes the recipe for the same. The key ingredient is good quality asafoetida and the key step is to roast the ingredients with love and patience. I will leave the final consistency & texture of chutney to individual preferences. Go ahead and try this simple food, makes for an amazing meal.

What do you need to make kadle bele chutney? 
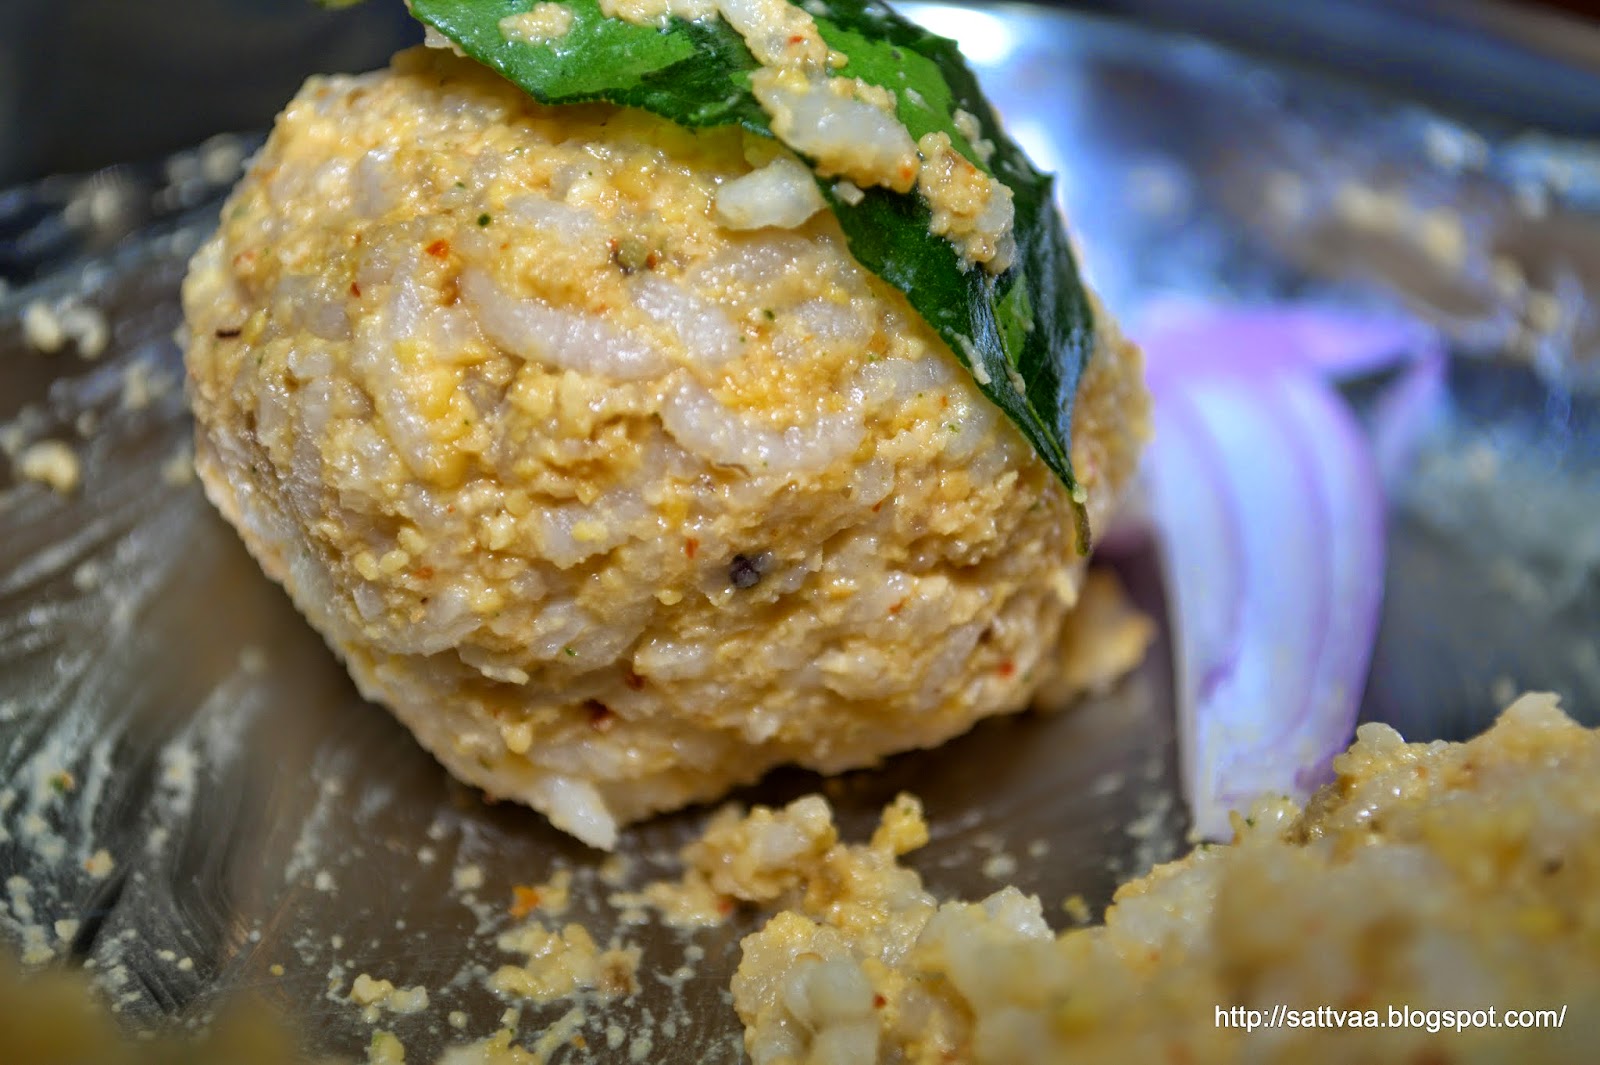
1/2-3/4 cup grated coconut
1/2 Tsp salt (adjust to taste)
To Roast: 
1/4 cup kadle bele/chana dal
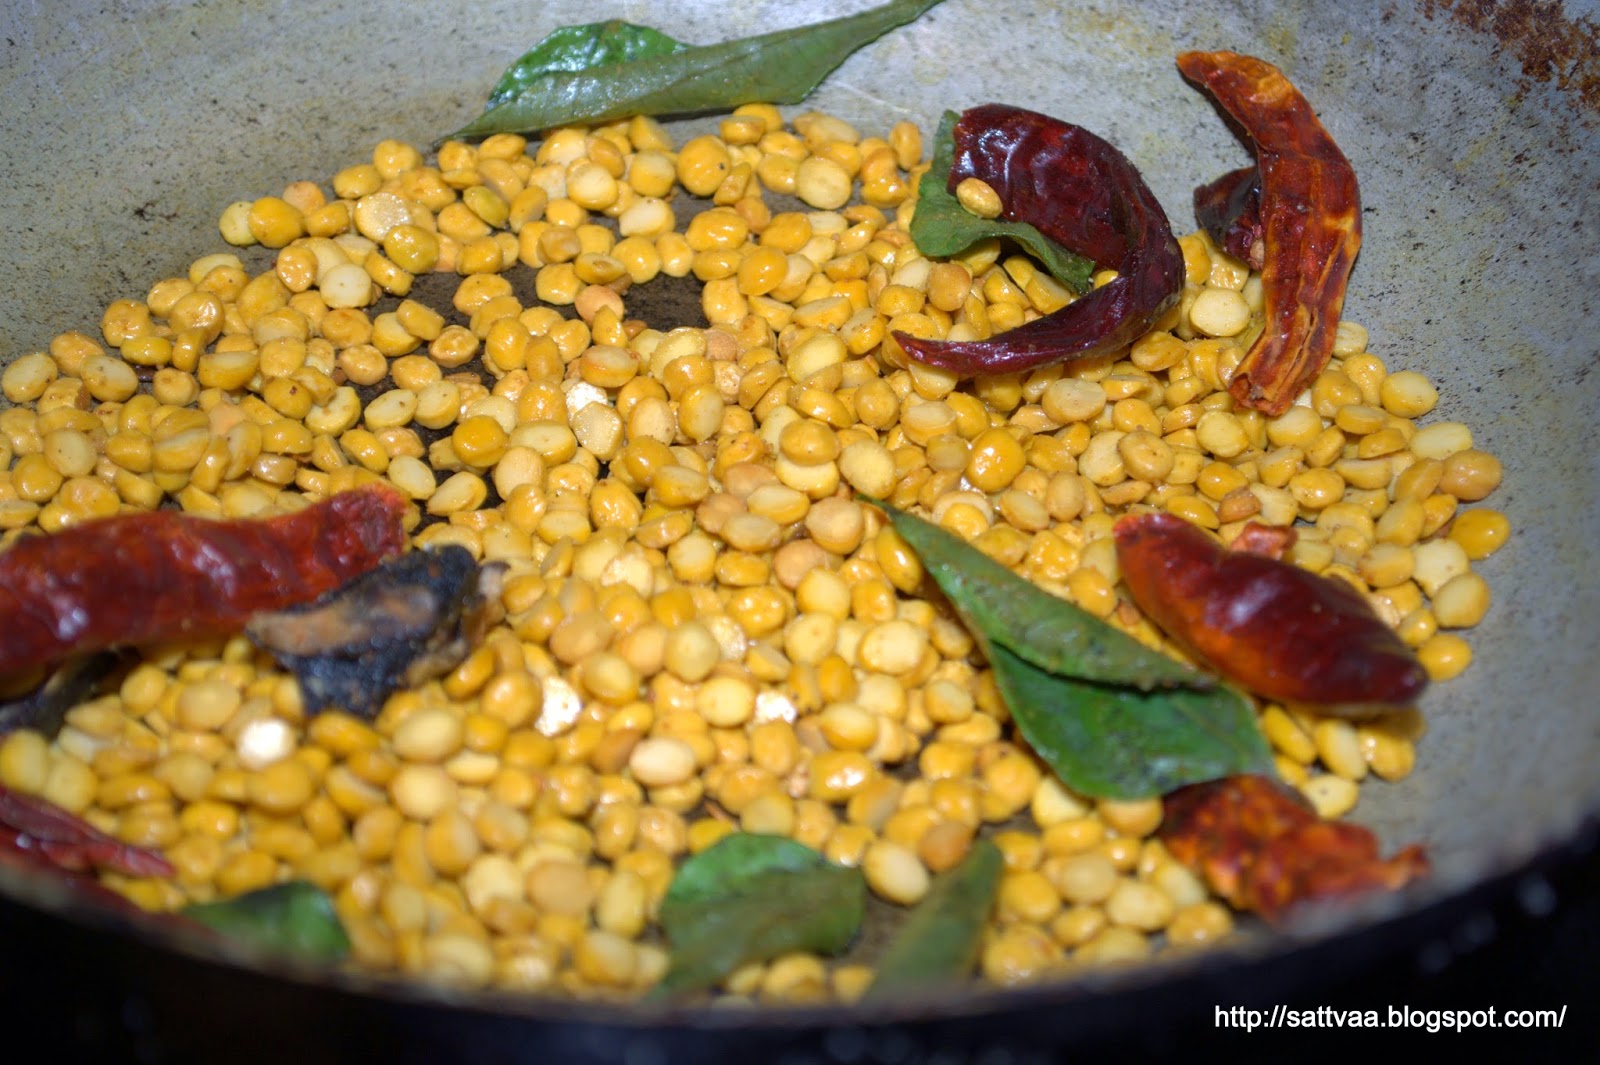
4-6 dry red chilies (adjust to taste)
small piece of tamarind
6-8 fenugreek seeds
3-5 curry leaves
1 Tsp oil
1/8-1/4 Tsp asafoetida
Seasoning: 
1 Tsp oil
1/2 Tsp mustard
3-4 curry leaves
1-2 pieces dry red chilies (optional)

How do you make kadle bele chutney? 

  • Heat Tsp of oil in a pan, add all ingredients listed under 'To roast'. 
  • Keep the heat on medium and frequently stirring roast the ingredients without letting any of them burn. 
  • After about 4-5 minutes, kadle bele turns light pink and becomes crispy and the red chilies look toasted (without black spots).
  • Switch off and let cool. 
  • Grind the roasted ingredients along with coconut, salt and 1/2 cup of water to a coarse paste. 
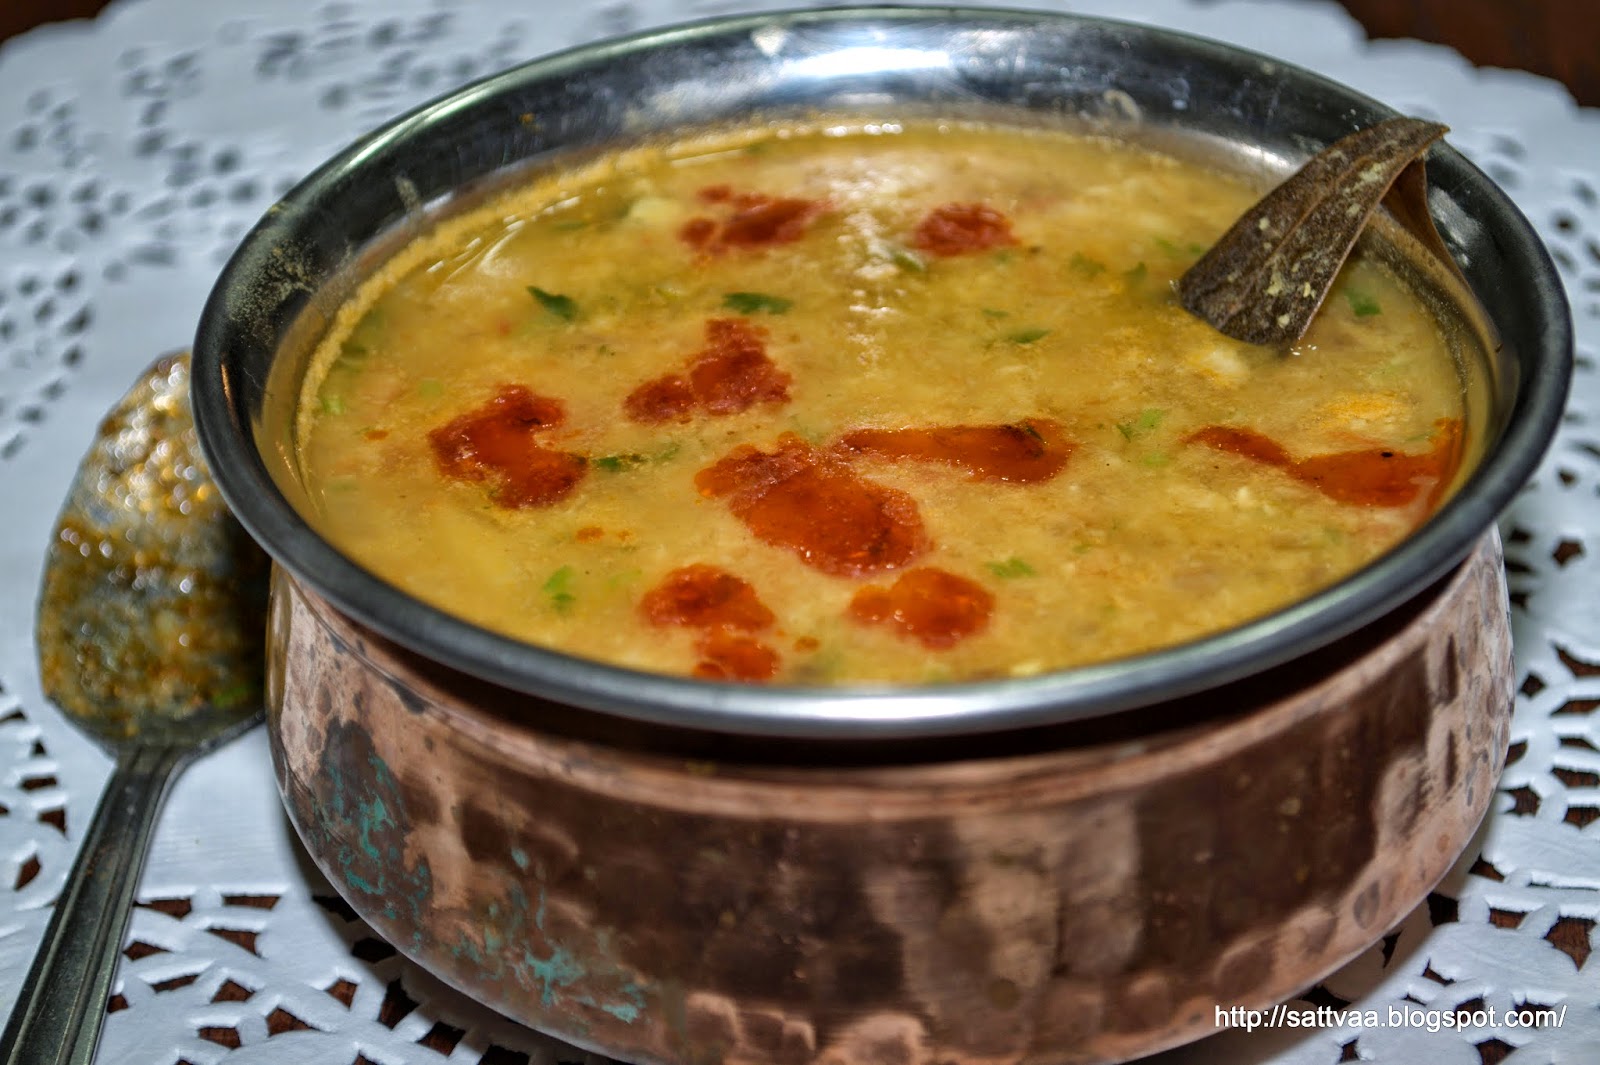
  • Take out the ground chutney into a bowl (or a plate like I did for the picture :-))
  • Heat the Tsp of oil, add mustard seeds and when it pops, add the curry leaves & red chilies (if using).
  • Switch off and pour the seasoning on top of chutney. 
  • Mix and serve with hot white rice. 
Notes: 
  • Since this chutney is generally mixed with rice, it is made spicier than normal. Tamarind and red chilies complement and mellow each other down, use them in proportion. 
  • I like to add a couple of drops of oil when I mix, go ahead and use ghee if you like for a flavor boost. 

Sunday, April 20, 2014

Minestrone soup - a deliciously hodge podge Sunday brunch

I not only love to bake bread but also enjoy eating different kinds of bread. The crustier and hardier they are, I like them better. It is no wonder I am always willing and ready to try out new places as long as there is a promise of good bread. It was on one such expeditions that I went to "Olive Garden", a popular chain of Italian food in North America and on BH's recommendation tried the unlimited soup and salad lunch there. But I mostly ended up filling myself with the soft, warm bread they serve at the beginning of every meal.
Olive Garden has been a regular joint for us as family as we can all satisfy our veg and non-veg preferences. Over time, I dug my spoon into the piping hot minestrone soup and fell in love with the various flavors in that super delicious vegetarian soup. Until I tasted minestrone soup, my view of soup was limited to the 'Tomato soup' from India which is creamy, tangy but doesn't have any floating vegetables. The minestrone knocked out all my notions about soup and opened up my eyes to the world of soupy possibilities. Minestrone has been a favorite for many years now and is part of my order whenever we go to Olive Garden along with their Eggplant Parmigiana.

I am not much of a pasta person, nor is cheese my favorite. Don't judge me :-), that is who I am. I order eggplant parmigiana, as soon as the plate comes, slide out the hot cheesy layer off the top of the eggplants and eat the crispy baked eggplants with black pepper sprinkled on top of them. Why order the dish when I don't eat half of it, you may ask and also when I take out the best part of the dish according to DD. I do not mean any disrespect to the recipe or the chef but I just don't enjoy the gooey cheese on top :-). I love the fresh salad though with the grated cheese on top that they invariably offer to every guest and that I politely decline every single time.
I had it on my list of things to do for a long time to make the minestrone soup at home. I collected a few recipes but every time I thought of making it, something wouldn't align such as it was the hot summer and not soup weather, or I didn't have something in the refrigerator/pantry that I deemed necessary for a good minestrone and etc.., so it kept getting pushed and finally today made it. DD says she doesn't mind having a lunch such as this every day for the rest of her life which I take as a compliment. So here I am with some pictures and a recipe for minestrone soup. A totally vegetarian and full of veggie goodness and flavors of fresh and dried herbs, this soup makes a very filling lunch. Pair it with some bread and you have an Italian lunch in your own kitchen.
Here is what happened to the bread, I have a wonderful pizza dough recipe (source: Peter Reinhart) that I have been using for a while now - will post the recipe sometime and I also use the same dough for making bread sticks, they turn as soft and delicious as the warm breads served in Olive Garden. I made a big batch of the pizza dough earlier this week and was planning to keep aside half of it for the bread sticks but since both BH & DD loved the texture of the pizza, they ended up making it twice in the week and the dough got over which put a small dent in my plans of an Italian brunch for the weekend. But like I said, stars were aligned perfectly this time for my minestrone soup and so when I was strolling in the food market here yesterday, I found some freshly baked French baguettes being filled into the basket, picked one up and came home. A slight change of plans, no Olive Garden style bread sticks but I made some fragrant bruschetta by slicing the baguette and it was a wonderful side for the extremely delicious minestrone soup.
Minestrone is a very versatile soup, it is almost like throw in any vegetables you have and still tastes good recipe. I used Giada's recipe from here, eliminating all non-vegetarian ingredients and making some changes to suit my personal palate. So mine is a completely vegetarian soup and tastes just like the one you get in Olive Garden. Try it out yourself and let me know how you liked it.
Here is why I call it hodge podge brunch, though it was Italian in every intent and theme, I used French baguette to make the bruschetta, made a very Indian, non-cheesy version of crispy eggplant and a fresh veggie salad that was dressed with a dressing from nowhere :-). I also had a bunch of fresh, organic fingerling potatoes that I par boiled and sauteed in olive oil and coated with chutney pudi and garnished with fresh cilantro :-).
What do you need to make Minestrone soup?
Makes 4-5 servings
2 Tbsp olive oil
1/2 cup finely chopped onion/shallots
2-3 medium sized carrots
1 medium zucchini
2 celery sticks
2 cups (tightly packed) greens such as chard, spinach or Kale
2 cloves of garlic
1 medium sized potato
2 big tomatoes
1.5 cup cooked canellini beans (Italian white kidney beans)
1/2 cup cooked pasta (typically shells are used)
4-6 basil leaves
1 sprig of fresh Rosemary
A small piece (about 1/2 Oz) of good quality Parmesan cheese
1 Tsp salt (adjust to taste)
1/2 Tsp freshly ground black pepper

How do you make Minestrone soup? 
  • Wash, peel and chop carrots into bite sized cubes. 
  • Wash, remove hard ends and chop celery into bite sized pieces. 
  • Peel, crush and chop garlic. 
  • Roughly chop the greens. 
  • Par boil tomatoes for 3-4 minutes and once cool, remove the skin and chop into chunks. Reserve the water for use in soup. 
  • Puree 1/2 cup of cooked beans with 1/4-1/2 cup of water into a smooth paste. 
  • Wash and chop zucchini and potato (i use the skin) into bite sized chunks.
  • Heat a sturdy pan or soup pot with olive oil. 
  • Add the chopped onions and saute for 3-4 minutes until it softens. 
  • Add chopped carrots and celery, saute for 5-6 minutes until they turn just soft. 
  • Add chopped garlic, zucchini, potatoes, cooked beans and tomatoes. 
  • Add salt, pepper and 3-5 cups of water, piece of cheese and pureed beans. 
  • Simmer for 1.5-2 hours. Slower you cook, better the soup tastes. 
  • When you reach the last half hour of cooking, add the chopped greens and let it wilt. 
  • Add cooked pasta about 10 minutes before you switch off along with chopped basil leaves. 
  • Switch off, cover and let stand for 10-15 minutes. 
  • Serve piping hot soup with a side of bread and garnished with extra grated cheese on top. 
Notes: 
  • I used canned beans which are pre cooked and salted. I wash them a couple of times under running water and drain before adding to the soup. 
  • Usually shell or bow pastas are used in Minestrone, you can skip this totally without affecting the taste. If using cook pasta following package instructions and add it towards the last 10 minutes or so before switching off the soup. 
  • You can use any greens mentioned above but the cooking time for chard or kale might be a little longer than spinach, so use your judgement. 
  • Adding Parmesan cheese is optional but gives a really authentic and rich taste to the soup. 
  • I like the slightly acidic taste of celery in soups and add them to most of my soups. 

Tuesday, April 15, 2014

Chocolate Babka muffins for Baking Partner's challenge and a BIG FAT alert :-)

Yayy!! I made it, middle of the week and I came home and baked and more importantly I am blogging about it. I just didn't want to ask Swathi for extension one more time :-). Well, if you follow my blog, you know today being the 15th of the month, it is time for a team of home bakers to bake and present a selected recipe. Swathi gave us 2 choices this time, I already have a carrot cake on the blog (which I think is the best ever carrot cake :-)), so chose to make these chocolate Babka muffins. They looked cute and adorable and ofcourse highly fattening with oodles of butter every step of the way. This fares at the top of the list of my 'most calorie dense' recipes so far on the blog.
All you health conscious people, before you go away trying to calm that pounding heart of yours, let me tell you the silver lining(s) of my version of the recipe. Well, I wish I could claim it was butterless, sugarless, eggless muffin like I always do :-), Alas, no such luck this time, it is eggless though (first silver lining if you are allergic to eggs or just don't like them) and I cut the butter by a third and sugar by a third. Given that this is a brioche type of dough, that reduction in butter and given that it is meant to be a cake, that reduction of sugar speak volumes about my concern for your health and mine too. I am misleading you here a little bit and intentionally too, here is the real story, I have not actually reduced butter or sugar from the main recipe but just chose not execute one part of the recipe. I cut some corners and did not add the streusel topping the original recipe called for. Swathi, I hope this still qualifies for the baking partner's challenge :-). If any of you are thinking that you missed out on the full blown buttery babka, let me assure you that is not the case and if it is any consolation the streusel topping didn't particularly look pretty :-) either, so nothing lost there..

What came out of the oven was most definitely delicious, buttery sweet, oozing melted chocolate, dreamy babkas which made the kitchen smell like Cinnabon's store front (if they were making fresh cinnamon buns that day in that location!) on a lazy weekend morning and made me a very happy baker. Thanks Tammy for suggesting the recipe, it is a keeper and I will make it again as long as I can find people to share it with.

My wiki knowledge about babka are that they are of Ukrainian origin, made sweet or savory (potatoes) with a really rich dough and served during Easter celebrations. They are also baked as loaves which you can slice up and slather some more butter on and enjoy. I liked the mini versions (not really mini as they grew in size, if you want small servings, make 18 pieces from the same dough).
This is a really simple and easy recipe, if you don't count the wait times, the actual hands on time is really small. So you can prepare it in between your other chores. I do not believe that the baked muffins have a long shelf life but you can freeze the rolled log in the refrigerator and and bake them fresh as needed. You just need to keep it out for a couple of hours for it to come to room temperature before baking.

DD has been working on a project for school and I gave her a mommy lecture about effects of procrastinating when I came home this evening only to be given a little reverse lecture from her later in the night as she found me scrambling to take the pictures on the day the post was due on the blog :-), that sets the score even for now and we can go back to being the happy mommy & daughter again (until next time that is..).

I have used unsweetened apple sauce as the egg replacement in this recipe. If you really want to know the streusel topping, you can refer to other baking partner's posts for details.
What do you need to make Babka muffins?
Recipe source 
Dough ingredients: 


1/2 cup warm milk (warm it to 110 degrees if you own a thermometer)
1/4 cup sugar
2 Tsp instant (rapid rise) yeast
1/4 cup unsweetened apple sauce (my replace for 1 large egg)
2 cups all purpose flour
1/2 Tsp salt
3 Tbsp unsalted butter at room temperature
Filling ingredients:
3/4 cup semi sweet chocolate chips
1/4 cup brown sugar
1 Tsp freshly ground cinnamon
pinch of salt
3 Tbsp unsalted butter at room temperature
How do you make Babka muffins?
Dough preparation:
  • Using a stand mixer, combine warm milk, sugar, yeast and blend a couple of times.
  • Add the apple sauce, flour and salt and mix until a sticky dough begins to form.
  • Add the butter and mix in until well blended.
  • Knead the dough for 10 minutes until it is soft and supple. It will still be quite loose in texture - do not add additional flour.
  • Put the kneaded dough in a buttered :-) or oiled bowl, cover and let it rest until it doubles in volume. It will take a couple of hours.
Filling preparation:
  • Put all ingredients except butter in a blender and blend it until chocolate chips are broken into tiny crumbs and mostly powdery.
  • Add butter and blend it till it comes together.
  • Keep aside until ready to use.
Making Babka muffins:
  • Line a muffin tray (makes 12 muffins) with paper liners.
  • Preheat the oven to 350F.
  • Turn over the dough on to the working area, press it gently to deflate, let it rest for 5 minutes.
  • Using dry flour, roll the dough into a thin rectangle of about 12X20 inches.
  • Spread the filling evenly all over the top of the rectangle. 
  • Starting from one end, roll it into a tight log.
  • Cut with a sharp knife into 12-1 inch pieces. 
  • Place them into the prepared muffin pans, cover with a tea towel and let it rise for about 30 minutes. 
  • Bake for 15-20 minutes or until it is poofy and starts to brown at the edges. 
  • Take it out onto the cooling rack and let cool or enjoy them warm :-)
These Babka muffins are going to a party with the rest of the Baking partners here.. 
Notes: 
  • The dough is easily made in a stand mixer, it is a little difficult to handle manually because of the amount of butter and the consistency of the dough. As long as you can successfully curb the urge to add more dry flour to make the dough manageable, go ahead and do it the old fashioned way using your own hands. 

Sunday, April 13, 2014

Neeru majjige (spiced buttermilk) - A Rama navami offering and summer special (delayed post by every account :-))

Last Tuesday we celebrated Sri Rama navami and as is customary, I made some neeru majjige, payasa and a kosambari in the evening. Took some pictures and put them in the draft as I was too tired to write that day. For the next 3 days, I was in all day training sessions at work which meant I was busy listening to presentations and talks that saturated my brain completely and when I returned home all I wanted to do was cook, eat and sleep :-). Notice the first verb in that last sentence, I love to cook and it relaxes me like no other activity. I am in my element in the kitchen and can cook after a long day of work but haven't found the energy to sit after a heavy meal and blog about it. I am taking pictures so that all the dishes will present themselves in due course.. but until then my posts will be a little erratic to say the least :-).
This weekend was gorgeous with temperatures touching 70F (yep, that is perfect summer weather for us :-)) and BH & I went back to our yearly routine of gardening. While the saplings are not yet ready in the stores, we prepared the bed, cleaned up the weeds, transported pots back to the outdoors so they can get some direct sun light instead of it being filtered through the windows. Well, here is how it mostly worked, while BH toiled in the Sun pushing our small tiller and squatted in the mud to pick up stubborn roots and large stones, I mostly stood looking very knowledgeable and called out smart decisions at regular intervals and was an integral part of planning the vegetable patch :-). I didn't make the saying "Behind every successful man there is a woman", I just follow it. Looking forward to enjoying some home grown bounty in the next 3-4 months. If no vegetables show up, atleast we will enjoy the green plants. Will keep you all posted. Last week, I went to the farmer's market during a lunch break as the weather was warm and very inviting, the walk down the hill for 2 blocks was a breath of fresh air and I loaded up on my quota of Vitamin D for the day, here are some pictures of the busy roads and busier people!
Back to the neeru majjige, which literally is yogurt thinned down with lotsa water and spiced with some herbs and spices. This is a staple in most homes in India during the hot summer months. The festival of Sri Rama navami celebrating the birth of Lord Rama comes in the month of March or April when Summer is typically starting and temperatures are soaring. So it is no surprise that most of the offerings during this festival have a cooling ingredient. We love neeru majjige any time of the year and I just make Ramanavami an excuse to churn some home made yogurt and make majjige. There is no big recipe here today, I will show you some variations I have seen and make but you can play with the herbs and spices used in the preparation to suit your palate.

Neeru majjige or buttermilk is considered healthier for daily consumption compared to thick yogurt, nammamma always churned and served buttermilk in lunch and dinner while yogurt was usually reserved as a side with rotti or dose(a) or avalakki during breakfast. Most South Indian meals end with a course of rice mixed with yogurt or buttermilk and it is served in all the weddings as the last course of a festive meal. I crave for that extra watery, lightly salted butter milk that falls on hot rice at the end of a very heavy meal. If I can have a piece of ripe lemon pickle on the side, I will probably eat just that one course without asking for anything else :-). Try that heavenly combination at home, very delicious and homely.

I recently had an Iranian/Persian version of spiced buttermilk in a friend's house and it was delicious. They call it Doogh and has a very strong mint flavor but is creamier and thicker than the butter milk I make at home.

Making home made yogurt is easy if you can get a good starter culture from some one :-). I some how have not grown used to the store bought yogurt and buttermilk except on rare occasions and like to make yogurt at home and I distribute generously to friends who ask for it since I will have a much wider network to ask for a starter from when I come back home from long vacations or if my yogurt goes bad for any reason :-).
A few things to keep in mind if you want to make yogurt regularly at home:
1. Always boil milk before attempting to make yogurt.
2. Always cool the milk to luke warm temperature (very similar to the warm water used for proofing the yeast since the yogurt culture will also die if the milk is too hot)
3. Use clean vessels to boil milk and set yogurt (nammamma and amma and now I all have separate vessels used only for the purpose, we do not use these vessels otherwise).
4. If you can get a good quality earthen pot, it works best for setting thick yogurt as it holds the temperature well, steel vessels work well too.
5. Here is the last of my tip I learnt from a friend (thanks S :-)) - once you add the starter yogurt to the warm milk, mix it well with a spoon, infact she told me to churn/whisk it once to get homogeneous, thick yogurt/curds.
Neeru majjige can be tailored and made in different ways. I sometimes use a whole lot of chopped cilantro and sometimes use just curry leaves shred into pieces. While I season it with oil roasted mustard and cumin sometimes, I just add ginger and green chili paste. In the very basic form it is whisked butter milk, thinned down with a lot of cold water and lightly salted. I personally like the yogurt to be a day old and slightly sour for added taste. So it is entirely up to you as to how you make it.

What do you need to make neeru majjige? 
1 cup home made (a day old) yogurt
4-5 cups of cold water
1 Tsp salt (adjust to taste)
2 small green chilies
1 inch piece of ginger (cleaned and peeled)
1 Tbsp chopped cilantro
Optional seasoning: 
1 Tsp oil
1/2 Tsp mustard
1/4 Tsp cumin
1/8 Tsp asafoetida
How do you make neeru majjige? 
  • Clean and crush green chilies and ginger into a rough paste using a mortar & pestle.
  • Take yogurt in a big bowl, add salt, crushed ginger-green chili and churn/whisk it using a hand whisk or a traditional wooden whisk (called kadegolu in Kannada)
  • Once the yogurt is homogeneous, add water to bring it to the desired consistency, mix well. 
  • Heat oil and add the seasoning ingredients, roast until mustard pops, add it to the buttermilk. 
  • Taste and adjust spices as needed. 
  • Keep aside for 20-30 minutes, serve chilled. You can sieve the buttermilk through a tea strainer to make a clear liquid. Longer you set it aside, the flavors get incorporated better. 
Variations: 
  • Use chopped mint or curry leaves in place of cilantro
  • If you have a garlic crush, add a clove or two to the seasoning. 
  • Crushed ajwain/carom seeds/bishop's weed imparts a wonderful flavor in buttermilk. 
  • Skip green chilies completely if you do not want a spicy buttermilk. 

Monday, April 7, 2014

Baati & Dal - A Sunday brunch special with the colors of Rajasthan

Hope everyone had a great weekend and getting back to the routine of the week days. School is out for a Spring break week which officially stamps the change of seasons. Winter is on its way out and Spring is showing its colors, the color burst looks gorgeous all around. We had some rains last week during the day and there was a bright, big rainbow across the sky, had never seen anything like that before, it was simply breathtaking. We stopped and got out of the car multiple times on the way just to enjoy the sight and breathe in the smell of the first rains. Without the dry, parched soil it doesn't smell like the Indian summer rains I remember but it was very calming and joyous all the same.

A few of months back, we had a group of BH's colleagues home for dinner and as everyone was enjoying the food, I was talking to one of the guys who is from Udaipur in Rajasthan. He loved my preparations and extended an invitation to come visit his family in Udaipur. The conversation turned towards Rajasthani delicacies and I told him we enjoyed dal-baati very much which apparently is a staple food in Rajasthan. While I mentioned how I baked them in the oven, he said that his mom first steams them and then bakes them to make them lighter and softer. Until then I thought baatis were hard baked bread. One day, as I was flipping through the pages of my '660 curries' by Raghavan Iyer, I came across the recipe for Baati and was pleasantly surprised to find him say baatis were steamed and then baked in the oven, it was sort of a validation. Most recipes found online ask you to bake them directly in the oven and this is how it is generally made. But steaming before baking not only gives them a wonderful shine on the outside but also makes them flakier and lighter with the same amount of oil/ghee. I have some pictures to show you the texture difference between the two methods and you have to take my word on the taste difference :-). These baatis when dunked in hot dal do not miss the ghee at all.
The first time I made baati and dal at home, I served dal on the side and kept the baati in the center of the plate. BH looked quizzically at me as if to ask how he was supposed to eat it. We broke the baatis, dipped them in the dal and took a bite, it was good but not magical or exotic like dal-baatis are made out to be, it felt like eating a really thick roti piece with dal :-). BH went ahead and poured dal all over the baati pieces to soak them further and ate them like idli-sambar :-). When I was searching the blogosphere, I found this link where they serve a jazzed up version of dal-baati. The chat lover that I am, it helped me fall in love with this every day food from Rajasthan and there was no looking back after that. We ended up spooning generous amounts of dal on top of baati pieces, garnishing the mixture with some chopped onions and cilantro on top. That is exactly how we eat this delicious combination every time I make them at home now. This might make traditional foodies from Rajasthan cringe a bit but as the saying goes in Kannada "Oota tanniche, nota pararicche (~ eating preferences should be to please your own self, ..), we continue to eat the hearty dal-baati served as a chat.
Traditionally, baati is served with panchmel dal (a lentil stew made with 5 dals) and the type of lentils and proportions vary vastly from region to region. Here is how I make it, though may not get a stamp of authenticity, it can hold very well on the taste with any authentic dal preparation. I go very light on the dry masala powders but give a vibrant color and flavor with the final tadka (seasoning) which knocks you out of this world especially if you are serving this as a chat.

I made a delicious dal-baati combination for brunch today and we enjoyed this healthy, nutritious and very filling meal on a lazy Sunday.
I have never been to Rajasthan, have only read about this great desert land nestled in the west of India. Like many of us, I have a bucket list of things to do and places to visit before my time is up :-). Visiting Rajasthan's desert definitely tops my list. If you are like me and have not yet visited Rajasthan, I recommend you watch this beautiful movie called 'Lamhe'. From the very first scenes of Waheeda Rehman ordering a very young looking Anil Kapoor to 'Matha Theko (prostrate and get blessings from the land)' to the final scene where the gorgeous Sridevi stands in a moonlit palace and tells a prem kahani (love story) to a group of village folks, the movie drips (just like the ghee from the baati) of the essence of Rajasthan for me. It has remained one of my favorite movies to date, I wonder why it was not well received :-(. Here is a beautiful Sridevi dancing gracefully to a folk inspired tune in Lamhe, enjoy the song while eating a bowl of baati-dal and if you like it, go ahead and get the full movie to watch. It is a visual treat!


I had a bunch of freshly picked and cleaned fenugreek leaves, I chopped some up and added it to the baati dough which made it very flavorful. You can add dry fenigreek leaves (kasoori methi) or other flavoring agents (see notes) or make baatis plain.
Baati in the foreground is baked directly, one in the background is steamed and then baked
What do you need to make Baati? 
Makes 12-14 baatis
2 cups wheat flour
1/4 Tsp baking soda
1/2 Tsp salt
2 green chilies minced
2 Tbsp oil
2 Tbsp finely chopped fresh fenugreek leaves (optional but recommended)
1/4 Tsp crushed ajwain
1/4 cup Tbsp yogurt
1/4 cup + 1 Tbsp water

How do you make Baati?
  • Sieve wheat flour, soda and salt together to remove any lumps.
  • Add oil, minced chilies, crushed ajwain, chopped fenugreek and mix it to crumbles. 
  • Add yogurt and bring the dough together. 
  • Add water slowly to make a stiff dough, keep kneading as you mix and stop at a hard dough consistency. 
  • Cover and let rest for 20 minutes.
  • Pre-heat oven to 350F. 
  • After the resting period, knead the dough for a couple of minutes to give it a smooth surface, break off golf sized pieces from the dough.
  • Roll them into smooth balls. 
  • I have a steamer container in my rice cooker which has holes all over so the steam from the hot water below steams the baatis on top. You can use any steamer you have or steam it in pressure cooker (without the weight) like you do for idlis. 
  • Set the balls with an inch of space in between and steam them for 10 minutes. 
  • Move the steamed baatis to the pre heated oven in the center rack (use a pizza stone if you have or a baking sheet). 
  • Bake them for a total of 18-20 minutes, turning each baati over after 10 minutes until they turn light brown. 

What do you need to make Panchmel Dal for the Baati?
1/4 cup toor dal
1/4 cup husked moong dal (dhuli hui-yellow colored)
1/4 cup green split moong dal or masoor dal
1/4 cup chana dal
1 Tsp urad dal
1 inch piece of ginger - peeled and julienned into thin strips
1 bay leaf
1 Tsp salt
1/4 Tsp turmeric powder
1/2 Tsp garam masala powder
1/4 Tsp coriander powder
1/2 cup minced onion
1/2 cup tomato puree
1/4 Tsp red chili powder
1/4 Tsp asafoetida
1/2 Tsp cumin seeds
2.5 Tbsp oil - divided use
1/2 Tsp ghee
2 Tbsp chopped cilantro

How do you make Panchmel Dal? 
  • Wash and soak dals for 30-45 mins, this will help cook it faster and better. 
  • Rinse and drain the water.
  • Take it to the pressure cooker along with ginger and bay leaf.
  • Add 1.5 cups of water, 1/2 Tsp salt and pressure cook for 2 whistles or until dals are soft and mushy. Let it cool.
  • Heat 2 Tbsp oil in a pan, add cumin and let sizzle.
  • Add the minced onion and fry for 2-3 minutes on medium heat until onion becomes soft.
  • Add the pureed tomato and turmeric powder and continue to cook for 5-6 minutes. Tomato loses the raw flavor and oil starts to show up on the sides of the pan.
  • Add garam masala and coriander powder, mix it well.
  • Add the cooked dal, adjust water to the desired consistency. Make it pouring consistency for use with baatis. 
  • Let it come to a good boil (4-6 minutes).
  • Add chopped cilantro and lemon juice and switch off.
  • Heat a pan with remaining oil and ghee on low heat.
  • Add asafoetida, red chili powder and heat it through, do not let it burn.
  • Pour this over the dal, cover and let it sit for 5 minutes so the flavor is infused before serving.

Serving Baati-Dal: 
  • Break hot baatis into bite sized pieces in a bowl.
  • Drizzle a couple of drops of ghee on top if you desire. 
  • Pour dal all over the baati pieces.
  • Garnish with finely chopped onions and cilantro. 
  • Eat while it is hot. 
Notes: 
  • Baati flavors - minced ginger, crushed saunf, kasoori methi etc
  • Some recipes call for adding 1 Tbsp of chick pea flour or sooji per cup of whole wheat flour for flavor and texture, I do not do this but if you want to try, go ahead. 
  • Traditionally, baati is taken out of the oven and dunked in a pot of melted ghee. Once it soaks up the ghee, it is served with dal. I have just reduced the number of calories in my recipe a little bit (or by a huge margin :-))