Wednesday, October 31, 2012

Cabbage Pathrode - perfect non-greasy rainy day snack

It is raining outside for the last 2 days and I am telling myself to stay away from my standard abode of deep fried snacks in this tempting weather but the cravings are just getting worse with every falling raindrop :-). Thoda Khatta, Thoda meetha, Thoda thika is what I want and the recipe below is a perfect blend of all these tastes and more. Oh yes I didn't need to put a pan full of oil and fry something either. This is a hands down win-win situation.

For people from Karnataka, Pathrode is either a Malenadu/Malnad or Mangalore delicacy, there are various ways of making this delicious recipe as the masala may change its shape & form from family to family. There are other versions of Pathrode elsewhere in India - such as the Patra from Maharastra or Gujarat. While the pathrode made with colocasia leaves still holds the top slot in popularity, the easier to make cabbage pathrode gives a tough competition.

A Mangalorean aunty who lived next door made these cabbage pathrode which were a new taste and treat for us Mysore people. I was a tiny tot who only remembers the taste even to this day but was not a kitchen enthusiast to ask for the recipe from aunty :-). I think amma had this recipe memorized at some point but somehow this dish kind of dropped out of the radar as the aunty moved to a different city and we lost touch with their family. There is a (or was a) Woodies restuarant on Commercial street in Bengaluru that had cabbage pathrode on their menu but as I remember it was on a week day only and I never got to try it.

Then when I started working, I had a friend A from Mangalore whose mom cooked delicious food but A could care less as she was totally oblivious to the joys of cooking. I had to pester her for this recipe for almost 3 years before she sent me an email with 'Hey N, here you go, I finally remembered to ask my mom about the cabbage pathrode recipe, you need coriander seeds, red chilies, little bit fenugreek, and a little bit jira... and etc' :-). It was hilarious and I still store a print out of that email safely tucked away in my cook books. But that gave me a decent start and I went on to play with the ingredients list and get the proportions to tickle my family's taste buds the right way. So here is a tried and tested cabbage pathrode recipe.

Cabbage pathrode is sweet, tangy, fiery chili spicy all at the same time along with coriander and cumin lending their unmistakable flavor. Play around with the red chilies or tamarind  or jaggery quantity to enjoy it the way you like most.
What do you need to make Cabbage Pathrode? 
Makes about 20-2x2x1 inch pieces
2 cups finely chopped cabbage
1.5 cups idli rava
2 Tblsp oil (divided use)
To roast & grind:
3 Tblsp urad dal
1/2 Tsp fenugreek seeds
1/2 Tsp cumin seeds
6-8 dry red chilies (adjust to taste)
To grind: 
1X1 inch piece tamarind/1 Tsp tamarind concentrate
1 Tblsp coriander seeds
1 Tblsp crushed jaggery/brown sugar
2 Tblsp chopped onion
3 Tblsp grated coconut (fresh or frozen)
1.5 Tblsp salt (adjust to taste)

How do you make Cabbage Pathrode? 
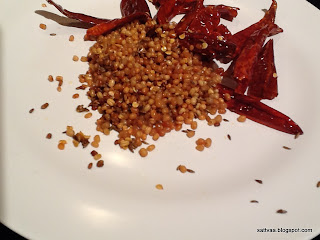
  • Heat 1 Tblsp oil, add urad dal, cumin, fenugreek seeds and red chilies and roast them on medium heat until urad dal turns bright pink (2-3 minutes)
  • Grind all items listed above along with the roasted ingredients from the step above into a coarse chutney, add about 1/2 cup water as needed. 
  • In a mixing bowl, mix together idli rava, chopped cabbage and the ground masala paste until it incorporates uniformly. 
  • The consistency of the mixed batter should be like the akki rotti batter, should hold shape when rolled into a ball without crumbling but should not be watery. 
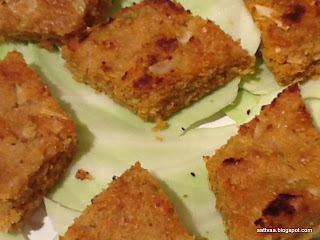
  • Here are two ways to make the cabbage pathrode, you can make small lemon sized balls and steam them or your can pat the batter into a steamer vessel to about an inch thickness and steam them. 
  • I prefer steaming them as one flat slab as it is easier to cut into pieces and roast later on. 
  • Steam (like idli) for about 20 minutes, switch off and enjoy with coconut chutney or ketchup as a side to your evening cuppa.
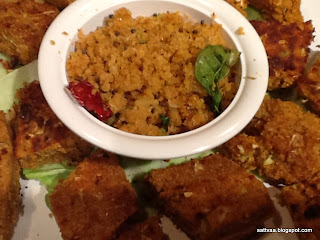
3 ways to enjoy Cabbage Pathrode:
Right off the steamer:
  • Enjoy the steamed pathrode without any embellishments 
Roasted pathrode pieces: 
  • When the steamed pathrode cools down, cut them into desired shapes
  • Heat a flat griddle, arrange the slices on top, drizzle a few drops of oil and roast them on medium heat until the surface turns light brown and crisp. 
  • Enjoy it as a snack with a dollop of ketchup or chutney.
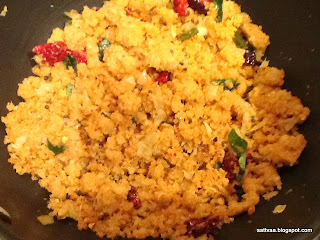
Seasoned Pathrode: 
  • Break the steamed pathrode into crumbs. 
  • Make a seasoning with a Tblsp of oil, pinch of asafoetida, 1 Tsp mustard, a few curry leaves and optional dry red chili pieces. 
  • Add the pathode pieces into the seasoning pan, mix it and let cook for 3-4 minutes. 
  • Enjoy a bowl of the seasoned pathrode, use it as a side dish. 
Notes: 
  • Do not add too much water to the batter - it dilutes the taste and doesn't steam to perfection. 
  • Steaming the pathrode is the same as making idlis - use your regular cooker and cooker vessels or idli cooker and idli plates.
  • Taste the masala after you grind it - it should be tad bit high on all tastes as it will mellow down upon mixing it with the idli rava. 
  • You can use the ground masala as a perfect accompaniment to dosa or idli if you like spicy chutneys.
  • Coriander seeds are  not roasted in this recipe.
  • It is important to roast the ingredients on medium heat and make sure urad dal gets cooked well, else you get that uncanny, unpleasant raw urad dal taste in the pathrode.

Monday, October 29, 2012

Methi roti - fresh greens in soft rotis

As we get ready to welcome the Autumn and the subsequent Wintry weather, I am wrapping up on my kitchen garden for this year. It is always such a nice feeling to be able to look through my bed room window and plan the next day's meal based on what is available in the tiny patch in the backyard. I love the flavor and freshness the home grown veggies bring to the dishes. As we bid goodbye to a really beautiful Summer we had over the last few months, I harvested the last batch of methi (fenugreek) leaves this week. I love these slightly bitter tasting, extremely flavorful greens in any form. Since there wasn't much today, I decided to make some methi rotis with them for lunch.

DD keeps reminding me that I haven't posted many basic recipes here on the blog so she can make them on her own and surprise me :-), while the offer is really tempting I see myself backing out of really basic, every day kind of food unless I see myself adding some value to it. But here is a pretty basic recipe that can be made by anyone. Sometimes if I crave for methi rotis and do not have fresh leaves I use kasoori methi (dried fenugreek leaves) instead but be forewarned that is not the same as the methi rotis made with fresh leaves.

The methi rotis are packed with all the flavor of fresh methi leaves, a little goes a long way here. You don't need a lot of methi leaves to enjoy the taste (although more is merrier and you can add as much as you want) so you can jazz up your every day roti with a handful of methi leaves. Roasting the methi leaves brings out their flavor and softens the leaves which makes it easier to roll the rotis.

Whole wheat flour + couple spoons of oil + roasted methi leaves rolled into soft, hot rotis, we had them with some dal and tomato pachadi.
What do you need to make methi rotis? 
Makes about 10 regular sized rotis
2 cups wheat flour + 1 Tsp for dusting
3/4 cup water
1 cup chopped fenugreek leaves
3/4 Tsp salt (adjust to taste)
1/2 Tsp red chili powder
2 Tsp oil (divided use)

How do you make methi rotis? 
  • Heat 1/2 Tsp oil in a small pan, add chopped methi leaves and saute for a minute or until it wilts.
  • Add salt, red chili powder to the leaves and cook for another minute until the leaves soften. 
  • Take the wheat flour in a wide bowl, add 1/2 Tsp oil, roasted methi leaves and mix it well. 
  • Add water slowly to get a soft, pliant dough, cover and set aside for 30 minutes. 
  • Remove the cover, knead the dough for a couple of minutes and pinch out lemon sized balls.
  • Roll the balls into thin discs using wheat flour to dust as required. 
  • Heat a flat griddle and roast the roti with a few drops of oil until it develops small brown spot on both surfaces. 
  • Serve it with any side dish of choice, I like to eat the hot off the griddle methi rotis just like that - bite by bite. 
Notes: 
  • Quantity of water given above is pretty close to what you would need to get a soft dough, different brands of wheat flour absorb water differently so watch out for it and adjust water. 
  • Keep the dough covered with a wet paper napkin or muslin cloth for about 30 minutes and also knead the dough for 3-4 minutes or until it is soft and elastic to touch. These make soft rotis. 
  • Don't roll these rotis very thin as they need to puff up and form layers when cooked. 
  • Be adventurous and add other spice powders such as amchoor powder or garam masala per your taste. You can use ground green chilies instead of the red chili powder for a different taste.

Thursday, October 25, 2012

Soutekayi gojju - curried cucumbers in coconut sauce

I am finally sitting down tonight and dismantling our bommala koluvu and cleaning up all the stuff in the basement. All the dolls will rest cozily wrapped up in papers and inside their boxes until next year. Some will go back to their every day place on the mantle or around the house. I am looking forward to the next month as we have family visiting, it will be busy and fun and no doubt lotsa food.

As I have mentioned before, gojju is a 'very Karnataka' recipe, in a very simplistic description it is curried vegetables and does not have lentils in it. It is a very common side dish for a rice based meal. Gojjus are typically high on their spices (chilies and tamarind) and go well with a piping hot Saaru/rasam on a rainy day.

Cucumber gojju is a very simple and common quick fix as it doesn't involve any cooking. Chop the cucumbers, add the ground masala and the 'hasi gojju (raw gojju)' is ready to eat. I eat it like a heavily dressed salad without really feeling the need for rice, they are good to mix with rice or have with rotis.

One of my doddamma's is a fantastic cook, her gojjus, saaru, uppinakayi are all to really die for, she is the one that eats mosaravalakki on a regular basis for dinner and I have sat in the kitchen waiting for her to drop a handful into my stretched palms :-). She made butter at home and put a dollop on top of the akki rotti or dosa for morning breakfast, I can never forget that taste even after all these years. She is not only an awesome cook but is very artistic and is adept at making things with household raw materials - she had taught me how to make wire baskets, beaded purses, home made winnows by soaking and grinding old newspapers, making clay lamps and many, many more. I only absorbed a tiny bit of her oceanic skills given my artistic limitations. Many of the things she did are either dying art or already extinct and replaced by store bought, plastic stuff.  She is old and frail now and doesn't cook anymore..but for all of us the taste of her cooking still lingers on the tongue.

Cucumbers are chopped very small for this gojju, doddamma used a method called 'kochu' in Kannada, she used the traditional vegetable chopper/coconut shredder and take a whole, peeled cucumber and keep making sharp, an inch and half long vertical cuts all over the cucumber, then turn it around and chop them horizontally to get really small pieces. Repeat this process of alternate vertical & horizontal cuts until you reached the end of the cucumber. This gives the tiniest yet not mashed up cucumber pieces best suited for this gojju and the traditional kosambaris. You can kind of imitate this process with knife or just chop them as small as you can. Choose a cucumber that is tender or cut in half and discard the seeds.
What do you need to make cucumber gojju? 
Serves 4 people as side dish
1 big green cucumber
1 heaped Tblsp grated coconut
1 Tsp crushed jaggery/brown sugar
1 Tsp salt (adjust to taste)
3-4 twigs of cilantro (optional)
To roast in oil:
1 Tsp oil
2 Tblsp chana dal/kadle bele
6-8 fenugreek seeds
1 Tblsp white sesame seeds
4-5 green chilies (adjust to taste)
1X1 inch piece of tamarind
To Season: 
1 Tsp oil
1 Tsp mustard
4-5 fenugreek seeds
2-3 curry leaves
pinch of asafoetida

How do you make cucumber gojju? 
  • Wash, peel and chop cucumber into very small pieces (discard seeds before chopping if they are big and hard).
  • Heat a Tsp oil on medium heat and fry all the ingredients under 'roast in oil' until chana dal turns light brown and green chilies develop blisters.
  • Take the roasted ingredients + coconut + jaggery + salt + 1 Tblsp of chopped cucumbers and cilantro (if using)to your mixer/blender and blend into a very smooth paste. Adding cucumber while grinding lets out water needed for grinding. The paste should be semi solid or a thick chutney. 
  • Add the ground paste to cucumbers and mix well.
  • Prepare seasoning - heat oil, add asafoetida, mustard, fenugreek seeds and let them pop. add curry leaves and switch off. 
  • Pour the seasoning on top of gojju and give it a mix. 
Notes:
  • I use the long thin English cucumbers sometimes which hardly has any grown seeds, so the entire thing gets chopped up. 
  • Adding cucumber pieces while grinding lets water and helps the grinding process, if you want add a little bit of water but make sure the ground paste resembles a thick chutney. 
  • Serve this soon after preparing as cucumber leaves a lot of water on mixing with water and makes the gravy diluted if you keep it for long. 
  • Addition of jaggery is recommended but not mandatory. 
  • Adding fenugreek seeds to the seasoning gives a wonderful flavor and bite to the gojju, skip this if you don't like fenugreek.
  • Adding tamarind while roasting the ingredients softens it up and makes it easier on the grinder. 
  • Break the green chilies by hand or roughly chop them before adding them into the hot oil, whole green chilies pop all over the place. 

Tuesday, October 23, 2012

Banana walnut muffins - tasty way to consume overripe bananas

My baking repertoire is very limited. Though I have switched many of my Indian deep fried recipes to baking as alternative, I don't delve into full time baking in my kitchen. I am yet to overcome my inhibitions about baking. However there are some very simplistic baking recipes I dish out frequently to make myself feel good :-). You can find some of my successful baking experiments herehere here.

After last weekend's bommala koluvu, as always I ended up with a bunch of fruits. BH & DD have a funny way of consuming fruits, they both love fruits as long as it is washed, cleaned and kept in front of them. I will have bags of oranges go unnoticed until I start peeling them, then there will be a pile of orange peels (and a plea for me to make Orange peel gojju) in a matter of minutes, same with other fruits.. they need someone (me) to start the process and then things will happen quickly when it comes to eating fruits. What can I say? it takes all kinds of people to balance this world :-) I could see the golden yellow bananas turning brown on their way to final stage of life. I have multiple ways for overripe banana nirvana in my kitchen and chose to make some plump muffins this time for DD to munch on while doing her homework.

If you have not tasted or heard of muffins, they are cute little roundish things that is widely popular as breakfast staples. For the uninitiated, they may look like cup cakes but they differ a lot from cupcakes. Googling for gyan, I found that muffins are made by preparing dry ingredients and wet ingredients separately, pouring wet ingredients over the dry ones (for muffin purposes sugar is considered as a wet ingredient) while cup cakes go through the 'cream them together ' concept with their ingredients. Muffins are not overly sweet like cup cakes and they are not frosted either. There are muffins made with eggs and without eggs.

I am not a vegan in my diet but as a personal choice I avoid eggs in recipes if there is a way out. This banana walnut cake is one of them, I have been baking this for a while now, started with a buttery recipe that called for eggs and have morphed it into a no-butter, no egg recipe by some trial & error and here is a perfectly soft, deliciously sweet muffin.
What do you need to make banana walnut muffins? 
Makes 12 big muffins
Wet ingredients:
4 ripe bananas
3/4 cup light brown sugar
1/3 cup oil (I used saffola oil, replace with canola or vegetable oil or with butter)
Dry ingredients: 
1.5 cups AP flour or maida
1 Tsp baking powder
1 Tsp baking soda
1/8 Tsp salt
1/2 cup + 1 Tblsp chopped walnuts

How do you make banana walnut muffins? 
  • Mash the bananas really well or run them in your blender like I do to make a puree.
  • Mix the wet ingredients together in a bowl. 
  • Sieve AP flour, salt, baking soda and baking powder in another bowl, make a well in the center. 
  • Pour the wet ingredients into the dry ingredients bowl and mix them in gently with a spoon. 
  • Fold in 1/2 cup of chopped walnuts. 
  • Preheat oven to 375F, line a muffin tray with muffin liners. 
  • Spoon the batter to 3/4 in each muffin groove. 
  • Add a few chopped nuts on top. 
  • Bake for 25 minutes or until a toothpick comes out clean. 
  • Enjoy the muffins warm or cold for a hearty breakfast or evening snack. 
Notes: 
  • It is important to not use a hand mixer or even mix for a long time with spoon as it activates the gluten while also using up the baking powder/soda. This causes muffins to not rise properly and turn them chewy & tough. Mix the ingredients gently until they come together.
  • I use brown sugar instead of regular sugar as it gives a nice brown color to the muffins and adds to the flavor. Myth buster: brown sugar is not a healthier option than white sugar. 
  • I have made these muffins with AP flour, bread flour and a combination of whole wheat and AP flour and we love it every time. If you are using wheat+AP flour, use 1 cup wheat and 1/2 cup AP flour. 
  • Walnuts is a personal choice and traditional option, replace it with any nuts of your choice - almonds, pistachio, pine nuts etc for crunch or omit them completely. 
  • Add 1/4 Tsp cardamom powder for the distinctive Indian dessert flavor if you like, bananas & cardamom are a great pair. I don't add it since DD doesn't like cardamom.
I am sending these muffins to Nupur's What with my Cuppa event.

Sunday, October 21, 2012

Dasara Navaratri - Celebrating the win of God over evil

Growing up in Mysore, Navaratri had a special charm, Mysore is the capital of the erstwhile Wodeyar kingdom and even though their is no king now, the traditional Dasara procession and the celebrations go on in full swing. The entire city lights up during the season - literally and figuratively, you can visit temples and attend poojas for spiritual pursuit, you can sit and watch a multitude of music and dance concerts in the Darbar hall, you can walk around the Dasara exhibition or the Kannambadi katte (KRS dam with the musical fountain) or just hang around anywhere in the vibrant city. The Mysore Palace darbar hall has many of the stalwarts of Carnatic & Hindustani musicians performing over the 10 day festival. We as a family enjoyed good music and dance and would attend as many concerts and recitals as we could during the season.
Vijayadashami day sees the world famous Mysore Dasara procession, people sit and wait at vantage points since early morning for the procession to start. All our cousins used to descend on us in Mysore as it is typically school holidays and while all of them went to see the Dasara procession, strangely I have never seen one personally. It was always 'I live here, I can do it next year' attitude and something else took precedence and also the fact that we had so much fun at home that sitting and waiting for the procession seemed like a waste of time for a fluttering kid.

One of my school friend's father was a forest ranger and the elephants that came to lead the procession and carry the Goddess Chamundeshwari's idol always were brought to his house which was 4 houses down the street. The majestic Drona who faithfully carried the Goddess's idol for many years was a treat to see upclose. We used to run to their house with plates full of bananas, rice, jaggery and coconut pieces to get a chance to feed those elephants and pet them for a few minutes. Elephants eating whole coconuts, elephants making bunches of bananas disappear in one go,  elephants drinking buckets of water,  elephants dropping big loads of hot poop on the road - we didn't need much to entertain us when we were kids :-).
We have a custom of arranging and displaying dolls in the house during Navaratri and hence it is also called as 'Gombe/Bombe habba' (Doll festival), Creativity is the only ingredient needed here and those days no one had collection of dolls from all the countries they had visited :-), the display was mainly composed of small Channapatna wooden pieces and if you were lucky, you would have a few more expensive dolls (No touching those - ha). One of my sister's friends had a big train that ran on a winding track and was operated by a mechanical key. We used to sit and wait in their living room until all the invitees filed in and the room was full and they would operate the key to make the train go around their gombe arrangement complete with all lights & choo choo sounds :-)

The best part of Navaratri was the evening Gombe aarthi and the gombe baagina, this is when all kids would go to different houses (mostly on invitation but there were gate crashers too) and come back with a goodie bag full of 'goodies' to munch on. Nammamma had invitees come over every evening starting from Sapthami (Saraswathi pooja day) - I follow the same tradition. There would be sweets & savories every day to share and evenings made colorful with everyone dressed in festive attire. All little girls would be made to sing a song or bhajan in front of the doll displays. Great opportunity at public singing for new students of the art :-) with very good intentioned, well meaning moms prodding, glaring and making sure their kids opened up.
Gombe aarthi is more about little kids unlike other festivals where married ladies take center stage. Amma had the same conversation every morning with me,  'How many friends are you inviting?' and I would say '10-15' but when evening came the number would somehow magically go into 40-50 range :-). Here is what happened, I would go to call a friend and see a few more friends of that friend hanging around and invite them too but fail to let amma know about it. I have  put her in trouble with her calculations of the gombe baagina very frequently and derailed her best laid plans. Thinking back, I really don't know how she graciously managed to serve and feed all those kids that came in, she probably had some kind of 'Akshaya Patre' (the mythological 'never empty' pot) in her kitchen. And I did get an earful after everyone left but then the story would repeat itself all over again next day or next year :-)
Navaratri also is special for me personally because BH & I met each other on the first day of Navaratri many years ago. He came to meet my parents in Mysore for the first time during the busy Dasara time. I realized his fear of heights when I first took him to the Mysore exhibition and tried the Giant Ferris wheel. I have had the pleasure of visiting that exhibition with little baby girl, tired with excitement but completely wide eyed at the lights and sounds around her. I have some awesome black & white pictures of my cherub taken at a nondescript stall.  When we set up the dolls every year, as we unpack them from their boxes we talk about where we got them from, who gave it to us and think about family & friends near and far.
We had a great time last evening with friends visiting and there was a lot of singing too by little girls and mommies and a grandmother who sang beautifully. As I have been scrambling with the arrangements and cooking, I completely forgot all about my food blog (!!!!) and so I have no pictures to share which means I will post the recipes some time later when I make them again and take proper pictures. Here is what was on the menu though - Puliyogare, Vegetable upma, moong dal pakoda, carrot payasa, kabuli chana usili, chutneys along with fruits for dinner and kodubale, 7 cups burfi, sajjappa and mucchore for the baagina.

Enjoy the remaining days of Navaratri and have fun.

Tuesday, October 16, 2012

Set dosa & kayi chutney - spongy & soft

A Very Happy Navaratri/Dasara to all my readers. It is great to see blogs busy with Navaratri celebrations and the prasada dishes. I have not started my Navaratri celebrations yet and will come back later in the weekend to tell you all about the goodies and celebrations.

Back to today's special - Set dosa, Why am I posting this during Navaratri? What is the relation you may ask. Nothing really, other than the fact that my family is game for this soft and spongy Dosa anytime of the year (and day). Also since I didn't make ahead any Navaratri dishes and don't plan to get my act together until later this week, here I am with my everyday Dosa but with a difference that will make you drool.

I have many non-South Indian and non-Indian friends who adore Dosas, these Indian pancakes (yeah, yeah, whatever.. since I can't seem to find a good word in my vocabulary that can actually do justice to these culinary marvels, let us go with pancakes for now) are a fixation with many of them. But for someone like me who grew up eating varieties of Dosas regularly, I find it hard to sometimes decide on a particular type of Dosa when I have my dosa loving guests. Most of them are exposed to the Dosa seen commonly in Indian restaurants and do not know the array of dosas that can be made at home. I usually fall back on the regular dosa unless it is a small group I can try something new on.

You find set dosa on the menu regularly in Mysore, Bengaluru restaurants though they seem to have morphed over years especially in the newer places catering to different palates, I saw a cheesy set dosa on my last visit. These are thick, soft and spongy not to be confused with the Uttappams which are made with regular dosa batter over fermented on purpose or by accident. Set Dosas have their own separate batter and ingredients that give the unique texture to it. Over the years I have experimented with many variations of set dosa recipes with poha, baking soda/eno fruit salt, sour yogurt, puffed rice & saboodana. While most of them give you a near hit recipe, I am very pleased with this one here and have been making my Set dosas with it.

Set dosas get their name as they are served in sets of 3 (or sometime 4 if the size is small) stacked one on top of other. These dosas are never cripsy or even browned in color, you only see a few light golden spots on the dosa. Set Dosas are served with the typical saagu in restaurants which is spiced liberally with cinnamon & cloves and a side of coconut chutney. I served mine with an extremely simple and delicious chutney, look for the recipe below. My daughter who usually touches her dosa to the chutney (since I give her the 'eat it now or else' mommy glare :-)), actually eats visible amounts of this chutney with anything.
What do you need to make Set dosas? 
Makes about 20-22 Dosas of 6-inch diameter
1/2 cup urad dal
1/2 cup saboodana/sabbakki
3 cups rice (I used sona masoori)
1/4 cup thick poha/avalakki
1 Tsp salt (adjust to taste)
How do you make Set Dosa? 
  • Wash & soak all the ingredients in water for 5-6 hours. 
  • Rinse and drain water.
  • Grind into a smooth batter using water to make a thicker than regular dosa batter but slightly thinner than idli batter. 
  • Add salt, mix it well, set aside to ferment overnight (atleast 12-14 hours in warm weather).
  • Heat a flat dosa griddle, pour a ladle full of batter and spread it lightly into a thick circle. 
  • Cook for a minute and half and flip it over and cook for half a minute before taking it off. 
Notes:
  • Keep the heat at medium and let the dosa cook for a minute or so without getting burnt or browned. 
  • Do not let the batter ferment to become sour, set dosas are mildly sweet. 
  • Original recipe tells you to soak the ingredients separately, I have made this many times and don't find a difference whether I soak them separately or together. Make your own choice. 
  • If your batter has fermented right, you will see small holes developing in the dosa immediately after the batter touches the hot griddle. 
  • Do not spread this dosa thin, it needs to have meat and be soft. 
  • I din't use any oil on this dosa and used my non-stick griddle thus making it a healthier too. 

Coconut Chutney - Take 1 cup hurigadle (chutney dal), 1/2 cup grated coconut, 3-4 green chilies, a small piece of ginger, 1/2 Tsp chopped onions and salt to taste and blend them into a smooth chutney adding water. 

You can use garlic instead of onion if you love the flavor (that is what my friend does where I tasted this first). Adjust the amount of green chilies based on your heat tolerance. 

Sunday, October 14, 2012

Neer dosa - delectable coastal Karnataka specialty

What is the best part about having friends from different places or travelling to different places in the world? There are many, first and foremost you make friends, you get to learn new things about different ways of life and yes there is definitely the most enticing part - food. I never shy away from asking a person for a recipe if I like it, you can even believe that I do sometimes chase people until they part with their recipes so I can recreate it in my kitchen.

We had this huge group of people in my project when I first started working many years ago. In those days (yeah, I make it sound like I am ancient but I am not, it is just that things have changed so rapidly) eating out was not the norm and even people who worked in the software industry preferred home made dabbas for the canteen or restaurant lunch. Infact, our office used to be in the city center in Bengaluru but we reserved eating out only to special occasions and occasional TGIFs. So a large group of us used to sit down together with our lunch boxes and just like in schools the boxes would go around for everyone to taste. And just like in schools, there used to be favorites and some of us would never get anything back in the dabba but some would come back with a little bit tasted :-).

One of my friends S is from Udupi region known for its distinctive flavors and yummy pickles and papads. His mom made some of the best neer dosas I have ever had. If there is a dosa I would carry in my lunch box, this is one as it stays soft even when cold. Aunty would pack him these soft layers with a spoonful of midi uppinakayi (pickled tiny whole mangoes) on top, so by the time we sat for lunch the dosa would have had a bath from the flowing pickle juice and would have turned just heavenly. There were 3 of us girls who would jump on S's lunch box every time he got neer dosa and poor S had to eat from one of our boxes whether he liked it or not. I think he did become smart since we started seeing more layers (= more dosas) in his lunch box after a while :).

Nammamma & akka make a similar dosa and we call it kaayi(coconut) dosa, the meat of tender coconut is used and the texture is very similar to neer dosa. This is usually made in Summer months when you drink a lot of tender coconut and have had enough of eating the pulp (though that has never been a problem for me as I love those soft, almost melting, not fully mature coconut and can just eat them forever). But 'neer dosa' is an authentic coastal karnataka name and recipe.

This is a dosa that doesn't get fermented like the traditional dosa and also needs just 3 ingredients including salt. If you are craving for soft dosas and do not want to wait for the batter to ferment, go ahead and give these a try. Eat it with any juicy pickle, chutney or spicy powders as the dosa itself is devoid of any spices.The rice to coconut ratio below gives a perfectly soft dosa, however you are welcome to increase the coconut if you like it. Although I have heard people making neer dosa without coconut, I recommend against it as dosa turns dry in that case.

Use a flat tawa/griddle and also notice how I don't call for a flipper. I use my non stick, flat, rectangular tawa and once cooked, I can easily peel the dosa and fold it in. This dosa is cooked only on one side, so keep the heat medium and the dosa covered so it cooks slowly and thoroughly. Aunty always folded the dosa twice, though I don't know the reason, here is my theory - it keeps the dosa soft for longer and it fit snugly into a lunch box :-).

What do you need to make Neer dosa? 
Makes about 5 regular size dosas
1 cup rice (I used regular sona masoori)
1/2 cup grated coconut
1 Tsp salt
5-6 cups water (adjust to get a flowing consistency)

How do you make Neer dosa? 
  • Wash and soak rice in water for about 6 hours.
  • Grind the soaked rice and coconut to a very smooth batter. 
  • Add salt and adjust the consistency of the batter by adding water. The batter should be flowy, almost runny like reduced fat milk :-). 
  • Heat the flat dosa griddle on medium heat, take a ladle full of batter and pour it in the center of the griddle. 
  • Lift the griddle off the heat and with a quick motion move it around so the dosa batter is spread. Do not use the back of the ladle like regular dosas. 
  • Cover and let it cook for a minute.
  • Hold one end of the dosa and fold it in half. Fold once more so you get 4 layers. Take off heat and serve with any spicy pickle or chutney. 
Notes: 
  • Grind rice and coconut to a very fine paste and add water to get the right consistency. 
  • Add a Tsp of cumin seeds while grinding if you like the flavor. 
  • The batter should be like milk, if it is thicker it will not self spread and the dosa becomes thick. 
  • It is important to let the dosa batter find its destiny in terms of shape, do not be impatient and use the ladle like regular dosa. Your role is just to move the griddle a little bit to guide the flowing batter. You will become an expert in making decent circular dosas with some practice. 
  • This dosa is white in color with very faint and few light brown spots and it is important to let it cook covered and on medium low heat. 

Wednesday, October 10, 2012

Kara Kulumbu - A Chettinad delicacy for Blog Hop Wednesday

Back again with another Blog Hop Wednesday and this time I am paired with the gal who started the blog hops, Radhika of Tickling Palates. I always think about her seemingly never ending supply of energy when it comes to blog posts and blog events. At any time, she has one or more events going on. Being a blogger, I know how much time and coordination they require and admire her for what she does.

I have always wanted to cook a Chettinad curry at home ever since I tasted this on one of our restaurant visits. Though, I was not bowled over by what I had that day, I always leave a pretty big margin when it comes to restaurants cooking up what they advertise as 'as good as home made', I was definitely taken up by the burst of flavors it had. I was looking for an authentic home made recipe and found it when Radhika posted this a couple of months back. Just didn't know I would actually make it for the blog hop :-).

Radhika tells you that the Chettinad vegetarian recipes do not get their due credit, I won't know about the non-vegetarian dishes as I haven't tasted them. There is nothing understated in the taste of Chettinad recipes, the flavors are bold and the burst of taste is quite a mouthful. It is an acquired taste and may take time to grow on some people. What I loved was the rich texture and the balanced mix of ingredients. I made a few changes from Radhika's original recipe, I used a combination of almonds and cashew nuts (5 almonds+2 cashew nuts) as I am quite nutty about healthy nuts. I replaced the black eyed peas with black chana or Kadle kalu since I had them handy and lastly reduced the amount of garlic from the original recipe to suit my garlic tolerance.
What do you need to make Chettinad Kara Kulumbu?
4-5 small purple eggplants (about 1 cup when chopped)
1 medium sized drum stick (4-6 pieces if you are using frozen)
15-20 pearl onions (more the merrier, I love them)
1/2 medium sized tomato - chopped into small pieces
1/2 cup cooked black chana/kadle kalu
Dry powders:
1 Tsp red chili powder
1 Tsp sambar powder (I used my home made huli pudi, replace with any equivalent sambar powder in the market)
1 Tsp dhania powder
Others:
A small gooseberry sized tamarind soaked in water for 20 minutes (use 1/2 Tsp tamarind concentrate)
1 Tsp salt - adjust to taste
1 clove garlic - chopped fine
2 Tblsp oil
1 tsp mustard
1/2 Tsp cumin
4-5 black pepper corns
4-5 curry leaves
To grind:
2 Tblsp grated coconut(fresh or frozen)
1 Tsp saunf
1/2 Tsp poppy seeds/gasagase
6-8 nuts (I used a combination of almonds & cashew, you can use either as you prefer)

It was a cloudy, masked up sky outside and had limited light which is the excuse I am giving for the picture quality
How to make Chettinad Kara Kulumbu?
  • Soak poppy seeds and the nuts in warm water for about 30 minutes.
  • Soak tamarind in water for 30 minutes and extract the juice. Skip this step if you are using tamarind concentrate.
  • Soak the black chana overnight and pressure cook it until soft but holds shape.
  • Heat oil in a wide pan, add mustard and let it splutter. Add cumin, black pepper, chopped garlic and curry leaves. 
  • Add the pearl onions after 30 seconds and let it cook until it starts to turn light pink. 
  • Add the chopped eggplants, drumsticks and tomatoes, give it a good mix. 
  • Add salt, cover and let cook on medium heat for about 8 minutes. 
  • Add the chili powder, dhania powder and sambar powder.
  • Add the tamarind extract and let it cook for a minute. 
  • Add the cooked black chana and continue to cook until eggplants and drumsticks turn soft.
  • Grind all ingredients noted separately above into a smooth paste adding water as necessary. 
  • Add the ground paste to the vegetables, adjust consistency with water and let it come to a boil. 
  • Switch off and serve warm.
Notes: 
  • You can increase the garlic per taste. 
  • The gravy thickens once it cools, so adjust the consistency while boiling it.
  • Make sure the eggplants hold shape and are just cooked for a great taste.
[Blog%2520Hop%255B2%255D.jpg]

Monday, October 8, 2012

Stuffed green chilies - Bharwan mirchi

The past week has been a big blob with all boundaries of day and night merged together. It has been hectic at work and I am as sleep deprived as can be. I have loads of catching up to do, didn't get to spend any time with DD or BH over the weekend as they tended to themselves, didn't make my weekend calls to catch up on folks back in India and didn't get to visit many of my favorite blogs and check out what they have been cooking. But then, the new week is a new beginning and so far seems to be sane enough that I will be able to get back to all my other stuff outside of work too :-).

What I rediscovered over this 'no time for anything else' week and weekend was that cooking still helps me stay grounded and actually massages my tired bones and nerves, my kitchen is a place I find myself at peace. So I did cook, infact we had guests over on Saturday for dinner, and that was very pleasantly distracting as I took some time off from gaping at my machine or sticking the phone to my ears. I am glad I am pretty good at what I love to do, think about my poor family if I was a wretched cook and still insisted on cooking no matter what :-)

I told you about the hot peppers that have been growing in my backyard, right? We already made Mirchi ka Salan twice as that is what DD wants every time we have those mirchis harvested :-). So, I called dibs on the 3rd round and sneaked them into this other favorite of ours. I first tasted this in one of my Marathi friend's lunch box, she had got one single piece to go with her rice and after gobbling up the whole thing I was still craving for more and she had to part with her secret recipe to keep me away from her lunch box next time ;-). I have seen a few versions of the Bharwan mirchi and have also tweaked the original recipe I got originally to suit my taste and here is a wonderful tasting besan stuffed green chili.

We got the sapling labelled 'hot peppers' and now that I have seen them full grown they are neither Jalapeno nor Anaheim but have thick skin, moderately hot and stand cooking well.

Almost always, when we visit South Indian restaurants, I end up ordering the cut mirchi platter for an appetizer. If you do not know what I am talking about, it is the hot chilies, dipped in a batter of basan & spices, deep fried in oil, cut in bite sized pieces, stuffed with more spices and raw onion and deep fried again and served with chopped onions and lemon wedges :-), ok, ok I will come back with that recipe another time. Notice the 'double deep fry' in there? That is not so good for any of us on a regular basis, right? So I always lean towards other options where possible and you can enjoy the tangy stuffed mirchi below just like you would a cut mirchi platter but definitely with lesser oil. I call this my 'reversed mirchi bajjis' as the basan is stuffed inside the jacket of the chilies.
What do you need to make basan stuffed green chilies?
12 green chilies (Anaheim or Jalapeno or other similarly thicker skinned variety)
1.5 cups besan
1 Tsp mustard
3-4 curry leaves - chopped small
2 Tbslp oil
Stuffing:
1/4 Tsp turmeric powder
5 Tblsp  oil
3/4 Tsp salt (adjust to taste)
1/8 Tsp asafoetida
2 Tblsp lemon juice
2 Tblsp cilantro/coriander leaves - chopped fine
Garden fresh green chilies, with some grape tomatoes thrown in for color
How do you make basan stuffed chilies? 
  • Wash, pat dry the chilies, remove the stem ends and make a vertical slit from top to bottom without cutting the chili. 
  • De-seed the chilies and keep aside. 
  • Mix all the stuffing ingredients in a wide plate except oil until they are well combined. 
  • Add oil and make a soft, crumbly mixture, this should stay in shape when molded. 
  • Take spoonfuls of stuffing and stuff them into the chilies, be generous on the stuffing as it helps to mellow down the hot chilies. 
  • Heat remaining 2 Tblsp of oil in a wide pan, add mustard and chopped curry leaves. Let the mustard sizzle.
  • Arrange the stuffed chilies in a single layer, reduce heat to low, cover and cook for 10 minutes. 
  • Open, turn the chilies over, cover and continue to cook for another 8-10 minutes until the chilies wilt and the basan cooks completely. 
  • Serve warm. 
Notes: 
  • The recipe I got from my friend adds a Tsp of coriander powder and 1/2 Tsp amchoor powder. I skipped the coriander completely and use the lemon as it helps build moisture and potentially reduces the oil used. 
  • These mirchis need to cook in a slow process - low heat and covered pan are key to a good stuffed mirchi. 
  • Low heat also ensures basan cooks thoroughly but not get burnt and the chilies turn lighter green in color.
  • Serve as a snack with some chopped onion and a few drops of lemon juice squeezed on top.