Sunday, September 30, 2012

Patholi - Dal & vegetables dry curry

I went for my annual health check last week and came back a bit more confused :-). Good thing is that there is nothing wrong with my numbers and I am as healthy as can be. Talking to my health coach (fancy, huh) I was reminded that quinoa is not all proteins though has high protein content per serving compared to anything else I might be eating in my vegetarian diet. She reiterated the fact that every edible thing has carbs and you just find ways to reduce its intake and start burning extra calories.

I came back home and did my research on 1 cup cooked white rice Vs brown rice Vs quinoa and after a wonderful knowledge session aided by the power of google, concluded that my forefathers were the smartest people to eat fresh food, as close to the source as possible without getting into processing them. Bottom line is the more you process and refine the food, the further away it tends to go from the healthy range. I am not here to lecture everyone on how they should stop eating processed foods, it is essential and convenient in the age we are in but try to make sure majority of your food is un(or under) processed, keep things in moderation, do not obsess about it much, exercise and enjoy life :-).

One thing that always comes back without change is that the main source of protein for a vegetarian like me comes from lentils and I love my lentils. I use quite a bit of sprouts, whole legumes in addition to the regular dal to boost the nutrition quotient. Dal is a regular at home and we do eat it in some form or shape every day. Having said that it can be quite boring to eat the same saaru/huli (Rasam/Sambar) every day and our cuisine offers every conceivable variation to suit every conceivable palate.

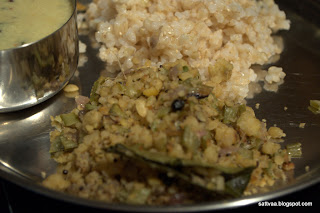
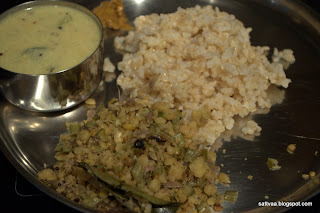
Patholi is a dry curry made with lentils and vegetables - each serving brings you both proteins and vitamins. Nammamma didn't make this very often as Karnataka has a special called nuchinunde (I will post it later sometime) which is steamed and delicious. Patholi is my mother in law's recipe and she usually adds Gorikayi (Guvar beans also called cluster beans) or makes it with just sauteed onions. Both taste great. You can add regular green beans instead of the cluster beans.
What do you need to make Patholi? 
2 cups chana dal/kadle bele
2 cups finely chopped gorikayi/cluster beans
1 cup thinly sliced onions
1.5 Tsp salt (adjust to taste)
2 Tblsp oil
1/4 Tsp asafoetida
1 Tsp mustard seeds
1 Tsp (8-10) black pepper corns
4-5 curry leaves
1 dry red chili broken into pieces (optional)
1X1 inch piece ginger root
4-5 green chilies (adjust to suit your spice level)

How do you make Patholi?
  • Soak chana dal in water for about an hour.
  • Wash and drain the water from the dal and grind it with green chilies and ginger pieces into a coarse paste. Try not to add water while grinding and run the blender in pulse mode to get the right consistency. 
  • Cook the cluster beans in 1.5 cups of water until they are soft but not mushy, strain the water and keep the cooked beans aside.
  • Heat a Tblsp of oil, add the asafoetida, mustard and pepper corns. Let the mustard crackle. Add the curry leaves, dry red chilies and fry for about 30 seconds. 
  • Add the thinly slices onions and saute until onion turns light pink.
  • Add the ground dal mixture and spoon the remaining oil around the inside edge of the pan, cover and cook for 6-8 minutes on medium heat.
  • Mix it once, add salt and continue to cook for another 4-5 minutes stirring frequently to avoid burning until the dal turns a shade darker in color and the raw smell is gone. 
  • Add the cooked cluster beans and mix it well. Cook for another 2-3 minutes and switch off. 
Notes: 
  • Use a non stick pan to reduce the oil intake in this recipe. 
  • For a lower calorie version, steam the ground dal mixture in your cooker (same procedure as making idli) and once it is cool, fluff up the cooked dal and saute it with fried onions and cooked beans. This version takes much less oil compared to directly frying the dal. 
  • Take care to grind the dal into a coarse paste - every dal should be broken up into tiny pieces but should not become a paste. 
  • If you blender needs water to run while grinding, go ahead and add it and take the course of steaming the dal before sauteing it. The steaming also absorbs the water and gives you fluffy cooked dal.
  • Wash the cluster beans, remove both ends by snapping them off with your fingers and also removing any strings that may be part of the beans before chopping them.
  • Covering the pan and letting the dal cook in the steam that develops helps reduce oil. 
  • You can use the water used to cook the beans as a broth in any of your curries for an added flavor.

Wednesday, September 26, 2012

Multigrain Zucchini paddu - Eat & stay healthy

Last Summer when I was in India (Ooh that tells me it is already over a year since I have been to India:-(), my personal limit is 2 years between visits and I start becoming all touchy after that. I am digressing, so let me postpone my India visit related rants to another day and get back to where I started. As I have told you before, my BIL is a foodie and a big time enthusiastic cook and he made these yummy, no soak, no grind paddus for us for one of the breakfasts. I love the concept of Paddus and I frequently make these cutesy items from my regular Dosa batter. So, as always I followed him to the kitchen to figure out the ingredients that made the delicious Paddus. He had used wheat flour, rava and a little bit of rice flour with lotsa grated cucumber. I came back to my kitchen and recreated it and my family loved the new recipe.

But then, it was around the time I was looking for healthier alternatives and Oats had become a staple in my pantry. I honestly don't relish the Oats porridge but then that is because I am not a person who can eat sweets for breakfast. So Oats found its way into many savory items in my kitchen and I really like the added texture it imparts to the instant Dosas. So I made certain changes to BIL's recipe - in goes the oats, I didn't replace the rava from the original recipe as it adds crunch. And since Zucchini takes to cooking better than regular cucumbers and also because I love the flavor of Zucchinis, I replaced cucumbers with these all purpose squashes.

As I said before, I don't yet have a full bounty kitchen garden but I got some good harvest done before the frost sets in. On that note everything around me is changing colors (I meant the nature) and I am falling in love once more with the beautiful Autumn. Does that happen to you? I loved the Summer very much and now I am starting to love the Autumn, not very faithful, huh :-). Anyways, before leaves change colors completely and fall off, there is still some Summer left in the late blooming Squashes and Zucchinis. I love Zucchinis for their flavor at the same time this vegetable has such a non-egoistic nature and blends into almost anything without making a fuss. So until the market starts to flood with Fall gourds of all shapes, sizes and colors, I am enjoying my Zucchinis.

I started Zucchini plants from seeds this year and as is the gardening norm, one plant grew and survived out of the many seeds I planted. While I was trying to decide if it was indeed a zucchini or a pumpkin looking at the bright yellow flower, one of the flowers quietly morphed itself into a bulb and kept growing longer and greener :-). Although it was not the Supermarket standard good looking, perfect dimensioned zucchini, our garden beauty was in no way inferior to those on the shelves in taste. We cut it this past weekend and there was unanimous voting for making the instant Paddus.

Paddu is called Guntapongalu in the Mysore region and Ponganalu in certain parts of Andhra Pradesh. I use the word 'Paddu' generically as we don't like tongue twisters in our multi language family :-). I make different kinds of paddus with different garnishes (see notes below for ideas) using different bases. Here is a delicious and completely healthy Paddu that can be made without any headache of soak/grind. Do not fret about the taste at all, and for those skeptics here is a testimony from my self declared 'Oats hater' FIL that he can give his mandatory rice a skip when these Paddus are on the menu :-). The first time I made after they landed here, I didn't tell him what was in it until the next day just to make sure I won't be hearing any 'my stomach is not all right today' as an excuse to eliminate the dreaded Oats from his diet.
What do you need to make Multigrain Zucchini Paddu? 
Makes about 30 Paddus
2 cups oats
1 cup wheat flour
1/2 cup chiroti rava or super fine rava
1 Tblsp rice flour
1 Tsp basan/gram flour
2 cups packed zucchini gratings
1/2 cup finely chopped onions
1 Tsp salt (adjust to taste)
1 green chili - chopped into small pieces
1/4 Tsp fresh ground black pepper powder
4-5 twigs of cilantro - finely chopped
1/4 cup chanadal - soaked for 45 minutes in water
1X1 inch piece of ginger - peeled and finely chopped
1/2 Tsp baking soda
1-2 Tblsp oil to roast the paddus
How do you make Multigrain Zucchini Paddu? 
  • Run the oats in your blender and make a fine powder of it. 
  • Take a wide bowl, add all the ingredients listed above except for the baking soda and oil. Mix into a soft batter. 
  • If you are making the Paddus immediately, add the baking soda and mix it in. Do not leave the batter for more than an hour after mixing the baking soda as it tends to collapse the Paddus into soft balls. 
  • Heat your Paddu pan/Ebelskiver pan on medium heat, drizzle drops of oil into the holes. 
  • Drop a spoon of the batter into the holes, cover and cook for 2 minutes or until the bottom of the Paddu turns light brown. 
  • Flip the Paddus over, drizzle drops of oil on top and let cook uncovered for another 2 minutes until the second side turns is cooked. 
  • Server hot or warm with any chutney or sambar. We had ours with spicy maagaya pachadi.
Paddu Dressing up suggestions: 
  • I usually add a 1/4 cup of small coconut pieces to the batter. 
  • Make a seasoning with 1 Tsp oil, 1 Tsp mustard, a pinch of asafoetida, 1/4 Tsp red chili powder and pour it into the batter. 
  • Add chopped curry leaves instead of cilantro for a different flavor. 
Notes:
  • Go ahead and use regular cucumbers if you can get zucchini or if you like that taste, remember that is how I tasted this first and loved it. 
  • I sometimes add a 1/4 cup of yogurt to make the batter lighter and also to give a tangy taste to the paddus. 
  • Addition of baking soda makes for a lighter Paddu as you have 2 dense flours in this recipe (wheat flour and oats powder).
  • You can increase/decrease or skip the garnishings above per your taste.
  • Heat the Paddu pan before dropping the batter into it (if you spray a drop of water on the pan, it should sizzle to indicate the pan is ready)
  • This batter is slightly gooey given that it has wheat flour and oats, the resulting paddus are softer unlike the traditional Dosa batter paddus.

Monday, September 24, 2012

Beet root palya/thoran and a trip to God's own country

A few years back we took a vacation and went on a house boat trip on the Vembannad lake in Kerala which is the longest lake in India and the largest fresh water lake in Kerala. It was a beautiful experience and as we sailed in a small houseboat on the calm waters, we were treated to some of the most delicious food over the course of 2 lunches, a dinner, a breakfast and a few snacks in between including the famous Kerala appam. One of the dishes that caught my fancy is the simple beetroot thoran or palya as we call in Kannada. It was very close to the palya nammamma makes with a few variations and the coconut lover that I am, I fell in love with the thoran that had almost the same quantity of grated coconut as the beetroot pieces - Hehehe.

Palya in Karnataka is typically steamed or sauteed vegetables with seasoning. These do not have a lot of masala ingredients and amma didn't use onions unless it was the potato-onion palya. The masala palyas are made for different purposes such as mixing it with rice to convert into a Bhaath. Gojju, chutney and other condiments bring the spicy accompaniment in Karnataka meals. I liked the house boat version as it had finely chopped onions which gave a distinct flavor to the palya. Nammamma typically cooks the vegetables and then pours over the seasoning on top but for this dish I follow my houseboat cook's method of cooking the vegetables in the seasoning. Amma uses chana dal & urad dal in the seasoning and they stay crunchy since they are poured on top.

Let us get ready to cook up a simple beetroot palya. With flavoring agents added in to this palya, I can just eat up a bowlful like salad. You can serve it as a side dish. Either way, treat yourself to a rich in antioxidants, heart healthy palya.
What do you need to make Beetroot Palya? 
2 medium sized beetroots
2 Tblsp finely chopped shallots or red onions
1 Tblsp grated coconut (fresh/frozen)
1 Tsp oil
1 Tsp mustard
1/2 Tsp cumin
1/8 Tsp asafoetida
2 dry red chilies broken into pieces
5-6 curry leaves
1 Tsp salt (adjust to taste)
1/2 Tsp sugar
How do you make Beetroot palya? 
  • Wash, peel and chop beetroots into really small pieces. 
  • Heat oil in a pan, add asafortida, mustard and cumin. Let the mustard crackle.
  • Add the chili pieces and curry leaves followed by chopped onions. 
  • Let the onions sweat for a minute, add the beetroot, grated coconut, salt and sugar.
  • Cover and cook on medium heat for 6-8 minutes, the pieces cook in the juices released.
  • Stir it once, cover and cook for another 4-5 minutes or until the pieces become soft. 
  • Switch off, serve hot or warm. I can eat this palya by itself like a salad. 
Notes: 
  • Choose fresh, juicy beetroots for this recipe for best taste.
  • Choose onions that are milder in flavor (shallots work best followed by the regular red onions)
  • I like finely chopped beetroot which actually cooks faster too, alternatively, you can grate them on the bigger side of the grater for a similar effect.
  • If you are worried about the beetroot getting burnt, add a Tblsp of water.
  • Addition of sugar helps retains the rich color of beetroot and also brings out the natural sweetness of beetroots.

Thursday, September 20, 2012

Gowri Ganesh Festival series 3 - Undrallu

Here I am with my concluding part of the Gowri-Ganesha festival series. I will post my other naivedya dishes over time as I want to take a break from the heavy festival food and go back to regular food for a while :-).

Continuing from where we left off in the last post, after the afternoon visits to see Ganesha idols, evenings used to be reserved for going with Amma to those homes that had actually invited us. The attraction and the difference with this one was guaranteed goodies at the end of the visit J, this was the time amma also completed any remaining ‘baagina’ work with her friends. Coming back home had us do another round of pooje, prepare Ganesha for the immersion (the same night or later) and eat dinner(if one could really force anything at all after all the constant eating throughout the day) and go to bed. 

The celebrations come to an end with the traditional immersion which is a big part of the Ganesha send off. Since we had the silver Ganesha, we never did the immersion which was cause enough to feel left out in the friend's group :-). Amma's small turmeric paste Ganesha would be dunked in a vessel of clean water and once it dissolved in water, the water went to her Tulsi(holy basil) plant. I think it was one of the most environmentally friendly ways looking at all the painted and non clay Ganesha idols that pollute our waters now. But as kids we felt like we missed out a lot of the festival by not going to the water with our Ganesha idol and so would be very thrilled to jump out at the first opportunity to tag along with a friend and family.

The Ganesha idols will be carried in procession, bigger the idol, larger the procession and louder the noise and immersed in designated ponds or lakes around Mysore. There used to be a lot of singing and dancing marking an end to the festivities (until Mysore woke up brightly to the Dasara celebrations in a month or so)

If only I could have held those years in my fist..It felt good to relive those memories on paper (Err.. on blog) and feel it in the present. I do a very abbreviated Gowri-Ganesha habba now and remember the old times fondly every year. Like any other Indian festival, these were made colorful with new clothes, good food, lot of visiting and sharing goodies. Last year, this was the first festival we celebrated in our new home. 

I have really enjoyed writing about my Gowri-Ganesh habba series. I am aware that this is by no means any new information to many of you as far as the festivals are concerned but it felt good to just reminisce about those childhood days. Thank you all for your comments and support. 

Here is a delicious, easy to make Ganesha favorite as we conclude this year's celebrations. This is a healthy, no oil savory recipe which I make quite often at home for breakfast. After two Kannadiga recipes, here is a typical Telugu dish made for the Ganesha festival. You can use regular store bought idli rava in this recipe but I recommend making it at home for better taste.
What do you need to make Undrallu?
Makes about 35 golf ball sized Undrallu 
2.5 cups rice rava(I use regular sona masoori)
5 cups water
1/2 cup chanadal
1 Tsp mustard
1/2 Tsp cumin
1-2 dry red chilies - broken into small pieces
2 Tblsp grated coconut (fresh or frozen)
3-4 curry leaves - chopped small
1 Tsp salt (adjust to taste)
1 Tsp ghee/clarified butter

Preparing Rice Rava at home: 
  • Wash and soak rice in water for 20-30 minutes.
  • Spread it on paper napkins or thin towels and let it dry inside the room until the moisture is gone (about 2 hours)
  • Pulse it in the mixer to get a coarse rava (Upma rava consistency).
  • Store in airtight containers for later use.
  • 2 cups of rice yields 2.5 cups of rice rava.
How do you make Undrallu? 
  • Roast the rice rava on medium heat for 3-4 minutes, stirring frequently. 
  • Soak chana dal in water for an hour or until the dal plumps up. 
  • Heat ghee in a pan, add mustard, cumin and let it sizzle. 
  • Add red chilies, curry leaves, grated coconut and chana dal and fry for a minute. 
  • Add the 5 cups of water, salt and let the water come to a gentle boil. 
  • Pour the rice rava in to the boiling water while constantly stirring the mixture to avoid lump formation.
  • Let it cook on low heat for 2-3 minutes. Switch off. 
  • As soon as the mixture is cool enough to handle, dip you hands in a bowl of cold water and make golf ball sized balls from it. 
  • Arrange in a steamer or a cooker pan, steam it for 10 minutes. 
  • Enjoy hot Undrallu with any spicy chutney or pickle of your choice. 
Notes: 
  • The mixture should not be left to become cold before the steaming, this makes the Undrallu chewy to bite. 
  • Adding coconut makes them tastier and lighter. 
  • You can use regular cooking oil instead of the ghee for a lower calorie recipe. 
  • I usually add Byadagi chili pieces so they are not very spicy. 
  • Rice rava to water ratio is 1:2 but feel free to use a little less or more based on the quality of the rava. The cooked mixture should be like a soft Upma, neither dry nor watery.

Wednesday, September 19, 2012

Gowri-Ganesha festival series 2 - Karigadubu

Hope you all had a good Ganesha habba celebration earlier today or yesterday depending on where you live. We did our pooja in the morning before starting work.

So continuing from last post on Gowri-Ganesha festivals, as kids we liked it when Gowri-Ganesha habba were on 2 different days. If they coincided, for one, you had to get up earlier so the Gowri pooje could finish earlier and the ladies could go home to do their Ganesha pooje. Secondly, all festival eating was crammed into that single day which meant we didn't have the extended second day habbada oota(festival food). Lastly but most importantly, it would mean one day off from school when the festivals merged which was a big bummer :-), this became a non issue when I went off to a convent school later.

Families that brought the clay Ganesha for the worship used to start their market visits a couple of days before. I just can't forget those crowded streets and the festival smell in the air. I get the same feeling shopping around Christmas time here :-). Our family didn't bring a clay Ganesha as our silver idols were kept for the pooja. This had a down side as it meant there was no immersion at the end of the festival for us :-(. Nammamma made a small Ganesha with turmeric paste to keep next to the silver idols.

The locality where we lived in Mysore during my school days, had a big community Ganesha right next to our house. There was a bunch of college students that would assemble together months before and start asking for donations. The organization grew in size and pomp every year and they kept extending the number of days of festivities. A day before the festival, they would stand up a temporary structure complete with a stage and an altar for the idols right in the middle of road, called 'Pandals' in colloquial languages. All traffic would be redirected. Blaring loud speakers touted the presence of a Ganesha Pandal at every road corner and go on 24 hours a day until the festivities came to an end 3/5/7 days later depending on the funds collected. On the day of the festival, the loud speakers would start with a devotional song on Ganesha and play some more for the first hour or so. Then for the rest of the day, we were entertained non stop with popular numbers from movies :-)  much to the dismay of elders. I still remember many of those songs in bits and pieces though I have absolutely no idea which movie it belonged to.  I still haven't figured out the relation between Ganesha habba and the movie songs.

For us kids, the best part of the festival was (apart from the food ofcourse) the Ganesha visit around the neighborhood. After the pooje and lunch at home, we used to set out in the hot afternoon with a group of like minded kids to visit as many Ganesha altars as we could with 101 being the magic number. You could find groups of kids on such mission all over the neighborhood. It used to be so much fun and exercise walking in the afternoons with friends trying to get people to open their doors for us. Most houses left the door open for the kids while some grouchy(I now feel it was genuinely a nuisance for older people trying to catch a wink of their afternoon siesta) old people would shout out from inside that we were not welcome. Nothing daunted us kids from our target of visiting 101 Ganesha altars :-), Oh the simple pleasures of childhood.

Once invited, we would go in, put some of the akshate(rice mixed with turmeric or kumkuma - used in Pooja) on top of the altar and do our prostration. Our quest for 101 Ganesha usually took us out of the familiar, immediate neighborhood into people's homes we didn't even know but there is strength in numbers and so noone was unduly scared. I don't think I can send my daughter off on such an expedition now :-(. I have been to houses that strictly forbade us from putting any akshate as it would spill all over the room, house owners that told us to be totally noiseless if there is such a thing involved when there are a bunch of giggling kids, houses that refused entry to us saying they didn't have a separate altar and houses that were actually nice and welcoming and saw us off with a piece of sweet or fruit.

And for people that wanted to see 101 Ganesha idols but didn't want to go from house to house in the hot Sun, Mysore had a short cut. There was a huge circle in the heart of the city which had 101 Ganesha idols during the festival. All you had to do was go there and do your prostrations.

Here is a funny anecdote from one of my Ganesha visits, my family has heard me narrate this incident many times as I repeat it every Ganesha habba. But I have promised them that I won't repeat from now on and if they ever miss my telling the story (I strongly doubt that), they can always open up the blog and read it. I had an elementary school classmate who was terrified of dogs and typically we would knock on the outside gate and ask "Nimma maneli Ganesha koorsiddeera?"(Do you have Ganesha altar set up in your house?) as a way of asking permission to come in and visit. This girl in her mortal fear of dogs and an honest slip of the tongue once asked "Nimma maneli naayi koorsiddeera?" (Do you have dog on your altar) and had the offended house owner chase us down the street :-). I have lost touch with her and always think if she still has that dog fear.

I made the traditional Karigadubu (The word comes from karida or deep fried kadubu) which is believed to be the Lord's favorite. Nammamma and the other ladies in my family always made this with a filling of dry coconut and sugar called 'Kobbari-sakkare'. There are many other variations of this dish where the filling could be made with some dal & jaggery combination. I love the kobbari-sakkare filling as it keeps the kadubu crisp and crunchy. DD took one bite of it today and declared 'No wonder Ganesha has such a big stomach, he can't stop eating this' :-)

I have made 2 different shapes here, one is the traditional kadubu and the other is called 'Lakkote holige' because of its shape resembling an envelope. The ingredients are exactly same, just a different shape. I have some step by step pictures for both shapes. If you make the lakkote holige, you will additionally use a clove to hold the shape together.
Our Ganesha Naivedya - kadle kalu usali, undrallu, pulihora and Karigadubu
What do you need to make Karigadubu?
Makes about 12 karigadubu
For filling: 
1 cup grated kobbari (this is the naturally dried coconut available in Indian stores)
1 cup sugar
1 Tsp poppy seeds (optional)
4-5 cardamom pods
For the outer covering: 
1 cup maida/all purpose flour
1/2 cup chiroti rava (super fine rava)
pinch of salt
1 Tsp ghee/clarified butter
1/4 cup water
Others: 
Oil to deep fry
1 Tsp maida/all purpose flour for dusting

How do you make Karigadubu?
Making the filling(Hoorana):
  • Dry roast the grated kobbari for a couple of minutes until it starts to give out a nice aroma, keep aside. 
  • Roast the poppy seeds for 2 minutes until it starts to pop, keep aside. 
  • Pulse sugar in your mixer till it is powdery. Add the roasted kobbari & poppy seeds and run the blender once to mix them in. 
  • Peel and pound the cardamom seeds into a fine powder and add it in. 
Outer covering(Kanaka): 
  • Mix all the ingredients listed under 'outer covering' into a slightly stiff dough. 
  • Knead for a good 5 minutes, wrap it in a wet cloth/paper napkin and set aside for atleast 30 minutes. 
  • Knead the dough for another 5 minutes, take out small lime sized portions of the dough and shape them into smooth balls. 
  • Keep them covered until you are ready to use. 
Making the Karigadubu: 
  • Heat the oil in a wide pan. 
  • Take a ball of the kanaka, dip lightly in the all purpose flour and roll into an oval shape roti with the lengthy side being about 4 inches.
  • Dip your fingers in water and coat the edge of the roti with it.
  • Take a spoon of the filling and put it in the center of the oval shape, pull one side over the other and press the edges together with fingers to seal them. 
  • Repeat for the remaining dough. 
  • When the oil is ready, drop the filled kadubu gently into the oil and let it cook until it puffs up and the outer cover looks light golden brown, 
  • Take them onto a paper lined plate. 
Karigadubu making sequence: 
Lakkote holige making sequence:
Notes: 
  • The thinner you roll the outer cover, the crisper your karigadubu will be. You need to strike a balance between having a thin cover Vs tearing it apart. 
  • Do not overfill the kadubu and ensure the edges are sealed to prevent it from opening up in the oil. 
  • Adding ghee to the cover makes the kadubu light and crispy. 
  • Kneading the dough twice is very essential to get a light, crispy kadubu as this process makes the dough soft.
  • If you plan on keeping the karigadubu for longer, I suggest double frying. After you remove the kadubus from the oil, let it sit for 5 minutes, dunk them in the hot oil once again and fry just for a minute or so. 

Tuesday, September 18, 2012

Gowri Ganesha Festival series 1 - Home made urad dal Chakli

As I said, I am here with a short series on Gowri-Ganesha festivals. I am sure a lot of you have similar experiences to share, I would love to hear about them. Do drop in a line when you visit.

Gowri-Ganesha habba(festival) was a big deal growing up for many reasons. Unlike many other festivals we celebrate, this one had the definite aura of being a community celebration. Ganesha habba is celebrated outside the confines of home in most states in India. This set of festivals (sometimes on the same day and sometimes on consecutive days based on the Hindu calendar) would be kicked off days before with the preparations.

At nammamma's, we do the Swarna Gowri Vrata which is an extended version of the festival. Not all families do the vrata and so lot of amma's lady friends would come to our house for that part of the festival. My father was the unofficial purohit/priest who led all the ladies through the elaborate pooja. During these days, the professional priests are extremely busy, if you had a priest come in to do the pooja, it meant you had to adjust your schedule according to the time they gave you, your cooking should be done by a specific time, all of you had to be ready before the priest showed up etc which was a hassle. My father made one swell of a purohit and everyone was happy with the arrangement.

The preparations for the festival used to start atleast a month or so before. For me the essence of Gowri habba is in the special 'Morada baagina'. Gowri vrata is performed by ladies/girls praying to the Goddess of Shakthi for her blessings. On this day, it is customary to prepare 'baagina' which is comparable at some level to a gift hamper with a bunch of things put in and is exchanged among the ladies. So the traditional 'mora' or 'winnow'(imagine a wide 3 edged cup made from thin strips of bamboo), this is used to separate grains from chaffe in Indian homes will be bought new, washed, sun dried, applied with turmeric powder and decorated (if you are one of those artistic people). An array of things went into the baagina based on whether it was a married woman or a young girl giving it to her contemporaries.

Small plastic bags of Wheat, Chana dal, Toor dal, Urad dal, Moong dal, salt, rice, jaggery had to be prepared along with a bunch of mangala dravya/auspicious things such as a small mirror, new comb, kumkuma-arishina, a small bunch of black beads, bangles, blouse piece for every set of baagina. Everything was arranged in one of the decorated winnows while the other was put on top as a cover. At that age, finding a nice pair of glass bangles to add to my collection made my day. I kept aside the shiny new comb and the bangles after the festival while the grains and other stuff went back to Amma :-). On the day of the festival, amma added some sweets and savories before the baagina exchange. In addition to her regular number, she used to have one or two extra sets to tide over if there were unexpected guests on that day. Things have changed and the mora is replaced by cute looking plastic containers but I think it was more fun in the 'mora' era :-).

Other than the baagina and the food, Gowri habba was special due to the decorations we did on the altar. Most homes set up a separate place in their living room specially to build a mantapa/altar.This is a festival where we had lot of visitors and everyone worked hard at making their altar look beautiful. The artsy kind of people were in great demand. Anna was incharge of the mantapa while akka would take over dressing up the idols for pooja. In our family I am the most 'uncraftsy' person, my creative best stops at counted cross stitches while my akka could come up with ideas and also make them from everyday materials. Akka made these beautiful jewelry with cotton to dress up the idol. She would get glittery, thin papers and other small trinkets to adorn those white necklaces. I did try my hands at it later on, when she was married and gone but mine were no where closer to what she used to make. She would also dress the idol with a nice, new piece of cloth.

I loved going to the market with my father on the day before the festival, crowded, extremely chaotic and noisy though it used to be. In addition to all the usual flowers and fruits and paan leaves and vegetables, special request would be for the lotus flowers. I don't remember getting lotus flowers for any other festival, maybe it was the season. But we would pick a few lotus flowers in yellow, red and pink colors, bring them home and put them in a bowl of water until the next day. These flowers do not open up on their own as they have been cut, so we gently pulled open each petal until a beautiful flower was ready. Both my parents being garden enthusiasts, we always had a lot of home grown flowers to deck up the altar.

Amma used to start the day very early, I don't even know when she actually got up as she made all the dishes for the naivedya after her bath. We joined her much later in the morning as we got up and took our bath. All little kids were assistants to other people and we would help Anna to build the mantapa. We picked out blemish free, green mango leaves that were uniform in size so he could build an aesthetically beautiful and geometrically perfect Torana/decoration with the leaves. Washing the front door, making nice Rangoli/kolam designs was part of the day and there always was an undeclared competition in the neighborhood to produce the best design in front of their home. This was one of the areas where I could mask away my clumsiness by making decent looking  'count and draw' designs :-)

The pooja used to start once all the ladies assembled and go on for an hour and half. After all the post-pooje events including the baagina exchange, it was lunch time. Having already eaten all the goodies from the time Pooje concluded officially, this was one of the lunches I used to pick at for a long time :-). Typical naivedya for Gowri habba is kayi obbattu (coconut-jaggery filling), kobbari mithai, chakli, chitranna along with the usual festival fare including saaru/rasam, palya, kosambari, paayasa. I left the big item out this year and prepared chakli, chitranna and kosambari.

I wish I had pictures to share with you about all this, I have been going through my albums for the last couple of days but haven't found blog worthy, non-personal pictures in my collection. Maybe some day I will revisit these posts to update pictures.

Chakli doesn't need an introduction if you are used to South Indian deep fried savories. It also goes by the name 'murukku'. The traditional chakli is one made with urad dal and rice and nammamma followed a process of soaking rice and shade drying it before sending it to be powdered with roasted urad dal. Since I don't have nammamma's home made chakli hittu/powder, I follow my SIL's recipe for a delicious urad dal chakli. You do not need to worry about making a fine powder as this recipe calls for making a paste of boiled urad dal which is so much easier on the blenders we have here.
What do you need to make Chakli/Chakkuli? 
Makes about 60-70 chaklis depending on the size, takes about 1.5 hours to fry them
1 cup urad dal (without husk)
4 cups rice flour
1 Tblsp sesame seeds
2 Tblsp butter
1.5 Tsp salt (adjust to taste)
3.5 cups water - divided use
Oil to deep fry

How do you make chakkuli?
  • Roast urad dal on medium heat until it turns light pick in color. 
  • Cook the roasted dal in your pressure cooker with 2 cups of water until it is soft.
  • When the dal comes to room temperature grind it to a soft paste using another 1/2-1 cup of water as needed.
  • Combine urad dal paste, rice flour, sesame seeds, butter and salt in a wide bowl and mix it into a soft, pliable dough. Use the remaining water as needed. 
  • Knead the dough for 5 minutes until it is a soft mass.
  • Heat the oil in a wide pan, if you drop a pinch of the dough it should come up to the surface right away. 
  • Put a handful of the dough in your chakkuli press and make chakkuli on a plastic sheet or aluminium foil.
  • Drop the chaklis one by one carefully into the hot oil, fry until golden brown and crisp and take them onto a plate lined with paper towels.. 
  • Finish up all the dough, let the chaklis cool off before storing them in airtight containers. This keeps well for a couple of weeks if you don't eat them :-)
Tips: 
  • Chakli making is quite easy but needs some practice to create those concentric circles. Hold the press at 2 inches above the surface and follow the flow of the dough as it comes out of the chakli press. Lightly press the tip of the outermost circle inside so the shape holds when it is fried.
  • Use a wide pan to heat oil, so chaklis have space to cook, do not crowd them one on top of other.
  • Keep the heat on medium and let the chaklis cook thoroughly so they stay crispy for a long time. Over heating of oil or quick frying results in a burnt outer layer and soft inner core. 
  • Chaklis tend to turn a shade darker as they cool, take them off the oil once the oil stops bubbling so they do not get over cooked.
  • Keep the butter outside for a half hour so it softens up before you use it in the dough. 
  • Before you load the chakli dough into the press, smear a few drops of cool water around the inside edges where it touches the dough so the press moves easily. 
  • Wet a paper napkin or a piece of cheecloth, squeeze the water out and use it to cover the chakli dough to keep it from becoming dry. 
Notes:
  • This Chakli dough is much softer and pliant than the regular chapati dough.
  • I usually make 5-6 chaklis on the aluminium sheet away from the hot oil and then slowly ease them one by one into the hot oil. I have seen some people use the chakli press directly in the oil pan to make chakli, it is just a matter of your preference and ease.
  • Once you put the chakli in hot oil, do not disturb them for a minute and half, Flip them only after they have had a chance to cook for this time else you will end up breaking the chaklis into pieces. 
  • A nice even golden brown color of chaklis indicate it is done as well as the stopping of the bubbles in the oil. 
  • Butter makes chakli crispy and light but too much of butter will break it into pieces. 
  • Amma usually added white sesame seeds to the chakli, you can get an alternate flavored chakli with cumin seeds.
Here is a plate of crispy, tasty chaklis for you to munch on while I will come back tomorrow with more dishes.

Monday, September 17, 2012

Gowri-Ganesha Habba Series - Lotsa stories and recipes too

Blogosphere seems inundated with Ganesha Chavithi celebratory recipes and many different customs & traditions related to the festival. This is a festival very dear to me and I have umpteen memories associated with  it. As I was thinking about my first Gowri-Ganesha habba on Sattvaa, I found that I really couldn't compress all of them into one single post, so I will start my short series on Gowri-Ganesha habba from tomorrow and will share with all of you some stories and some recipes for the next 3 or 4 posts. You just have to wait until I am done with the naivedya to taste the food :-).

As India starts to celebrate Gowri Habba in a few hours, I just wanted to hop in and say..


A Very Happy Gowri-Ganesha Habba to all of you celebrating the festival


Thursday, September 13, 2012

Eggless Meyer lemon cake and a milestone

When life gives you lemons you enjoy lemonade. When life surprises you with Meyer lemons what do you do? I kept coming across many flattering notes about Meyer lemon in the cook books and shows I read or watched. It has been hailed as the wonderful lemon by many chefs and I kept wanting to discover this treat causing such a stir in the culinary world. Last year with our relocation, I missed the season as it runs November through March. But then with so much popularity and demand the fruit has been cultivated and you do notice off-season picks in stores. May be one day, it will be available around the year :-). I found boxes of these mini beauties in Costco last week and immediately brought home a box to feel, taste and experiment with them.

For the uninitiated, Meyer lemons are smaller lemons (compared to the usual ones you find in grocery store isles) and are a mix of lemon and mandarin/orange. They have a rich yellow color bordering on orange. This is a native fruit from China brought to the US and grown locally now. I recently found out that you can grow meyer lemons in pots, and it is on my list of future things to do. Why all the hype around Meyer lemons? These have a tangy flavor like regular lemons but are not as strong as the regular lemons that make you pucker, you can actually eat it as a fruit if you like the tart mandarins. What makes Mayer lemons special is the overwhelming flavor, the aroma simply takes your breath away. It is a very refreshing feel in the kitchen. There are down sides, these are not replacements to lemons or mandarins for that matter because it is a cross between the two and also at the higher price tag you should stick to lemons and mandarin to do their regular job :-). But, it is definitely worth once in a while to indulge in these delicious fruits.
I tried these Meyer lemons in various recipes and the verdict: it gives a wonderful boost to cakes and quick breads and makes a quick pickle (the skin softens faster than the regular lemon) but is not a good substitute if you are making lemon rice :-). Will I use it again, yes when in season and cheaper but not resort to impulse buy out-of-season denting my pocket.

My daughter loves lemon cakes, the soft, slightly tangy ones are her favorites. So I set out on a search for a lemon cake preferably without eggs (as amma is visiting and she doesn't eat eggs and though no restrictions I would love it without eggs too) and googled quite a bit. Finally zeroed on a recipe from here. She uses regular lemons, adds lemon extract, extra virgin olive oil and maple syrup as sweetener. I made certain changes to suit my family's taste and used what I had in my pantry, we ended up loving every bite of the the soft, moist and 'Meyer lemony' cake.

Oh about the milestone, this is the 100th post on Sattvaa :-). It has been 8 months and I had no targets (still do not have) on the number of posts and here I am with my 100th post. It feels very good and I am grateful to all you readers that visit me often, it makes my day to see your comments and see the stats. Those of you that have chosen to remain anonymous so far for any reason, consider taking a moment next time you visit and leave me a comment (good, bad, ugly anything), I would love to hear from you.

So here is a celebration recipe of a simple eggless, butterless Meyer lemon cake to go with your evening chai. And yes, you can definitely use the regular lemon in this recipe, look for my notes at the end.
What do you need to make Mayer Lemon Tea cake? 
Recipe Source: Chef Chloe
2 cups All purpose flour
1 Tsp baking soda
1 Tsp baking powder
1/4 Tsp salt
1/2 cup cooking oil (I used Sunflower oil)
1/2 cup sugar
3/4 cup water
1/2 cup Meyer lemon juice
2 heaped Tblsp lemon zest (I grated 3 Meyer lemons)
How do you make Mayer Lemon Tea cake? 
  • Preheat oven to 350F.
  • In a wide bowl mix AP flour, baking soda, baking powder, salt.
  • In a separate bowl add oil, sugar, lemon juice, water, lemon extract and whisk it for a couple of minutes. 
  • Pour the wet mixture into the dry ingredients and mix them together until it forms a batter without lumps. Do not over mix and I didn't use my hand mixer either. 
  • I used my bread baking pan -  pour the mixture in and bake it for 25-30 minutes until a toothpick comes out clean. 
  • Let the cake cool down completely before slicing and eating. 
  • Enjoy the lemony goodness with a hint of tangerine flavor. 
Notes:
  • If using regular lemons, reduce the amount of lemon juice to 1/4 cup to not make the cake taste too tart. 
  • As I mentioned, the original recipe calls for maple syrup but I used regular sugar for sweetener.